Russia
Joined: Aug 13, 2022
Post Count: 233
Status:
Offline
Re: Apartment project with lighting by invisible hemispheres. I continue advertising
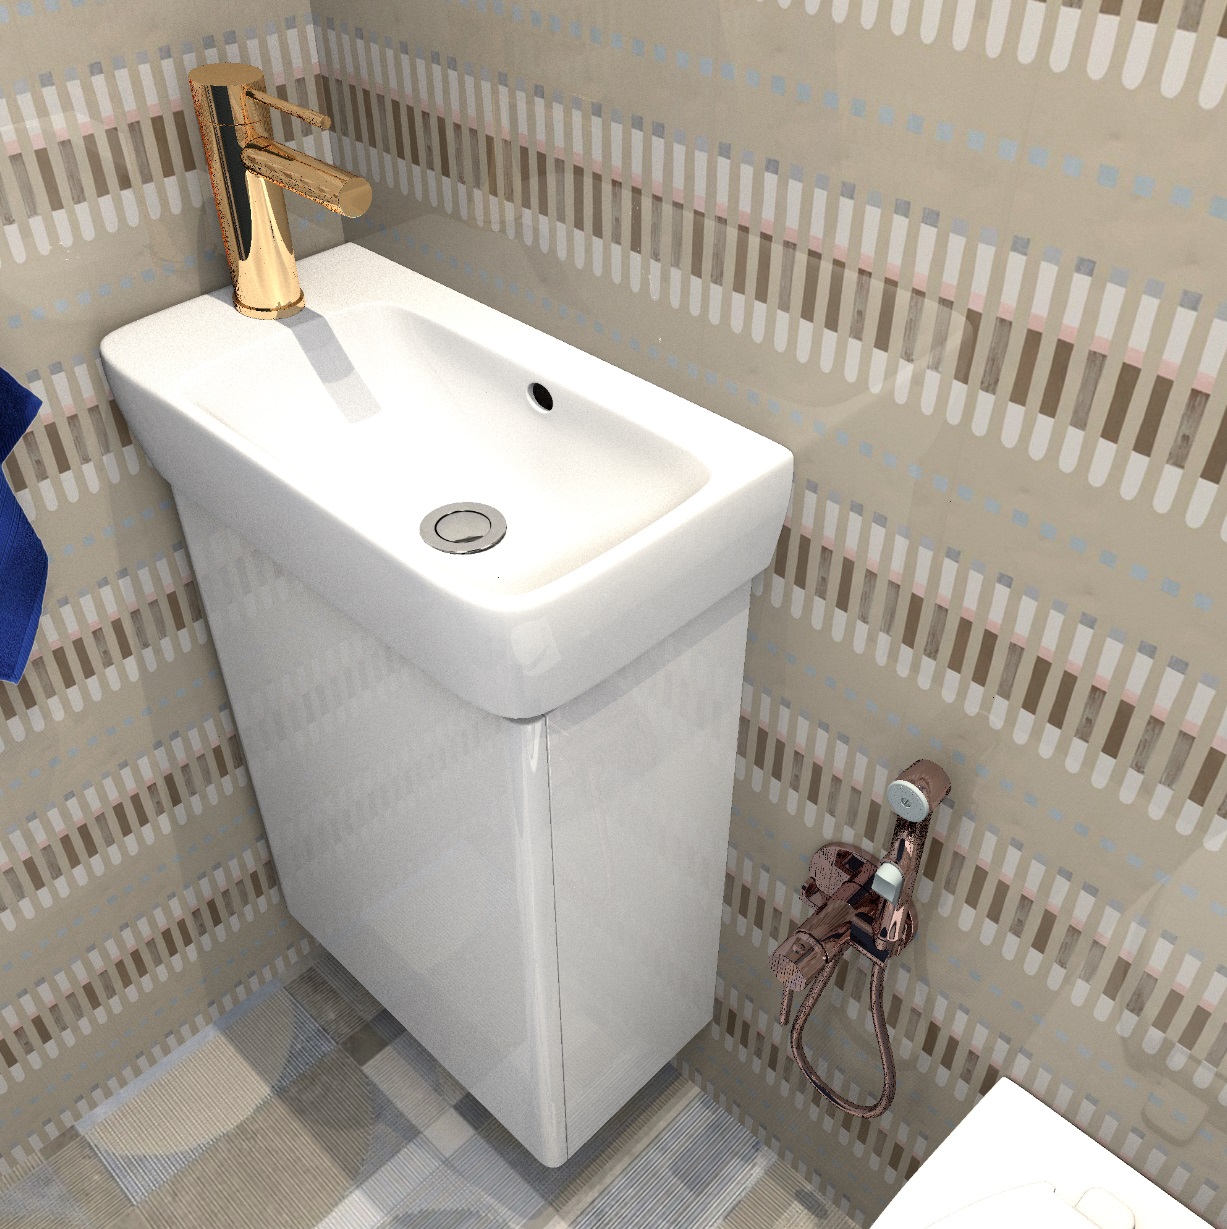
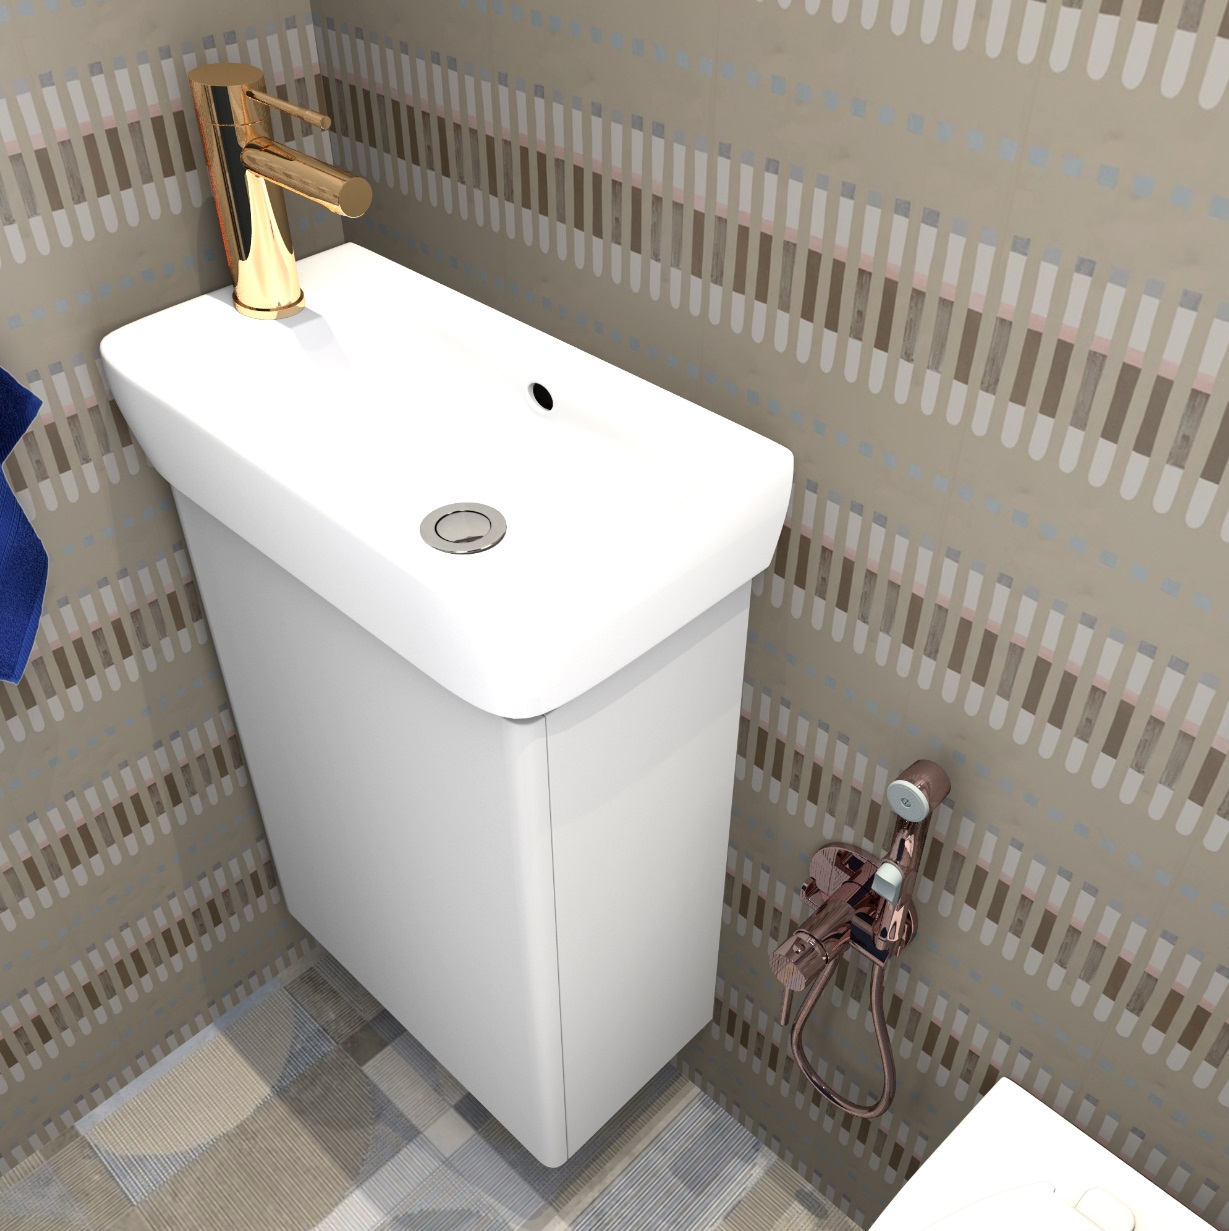
I think I've figured out how to defeat the white outline around the figure. It's thin and thick, although I do everything the same every time. The contour I assume is the noise from pixels on the border of the transparent background and the image. The sharper the border, the less noise there is. I did it radically. First, I enlarged the photo in Paint to a very large size of 5000 pixels in height. The photo quality remained the same, but the old pixels were fragmented into smaller ones. And with this smaller set of pixels in Photoshop, I started cleaning the background with an eraser. The eraser should be made as rigid as possible in the settings, then a sharp border is obtained. " The magic wand" cannot be used, it cleans the background very roughly. When everything is ready, you need to save it to PNG and export it to SH3D without reducing pixels. Then the contour turns out to be very thin, almost disappears. This is the easiest way, it works. Next time I'll completely enlarge the original photo, up to 10,000 in height, see what happens. I made everything glossy to show the reflections in the walls. Once again, this is only possible at the third level of quality.
For comparison, a render with the same settings in the fourth quality level. Yes, the metal turns out perfectly, there are no random broken pixels of an incomprehensible color, but there will be no reflections in glossy materials (except for the mirror, of course) at all. So if you weigh all the cons and pros, then the maximum level is only good for shiny spoons and forks. He does not solve general problems with materials, everything turns out to be primitive. And it loads at 4!! twice as long.
Russia
Joined: Aug 13, 2022
Post Count: 233
Status:
Offline
Re: Apartment project with lighting by invisible hemispheres. I continue advertising
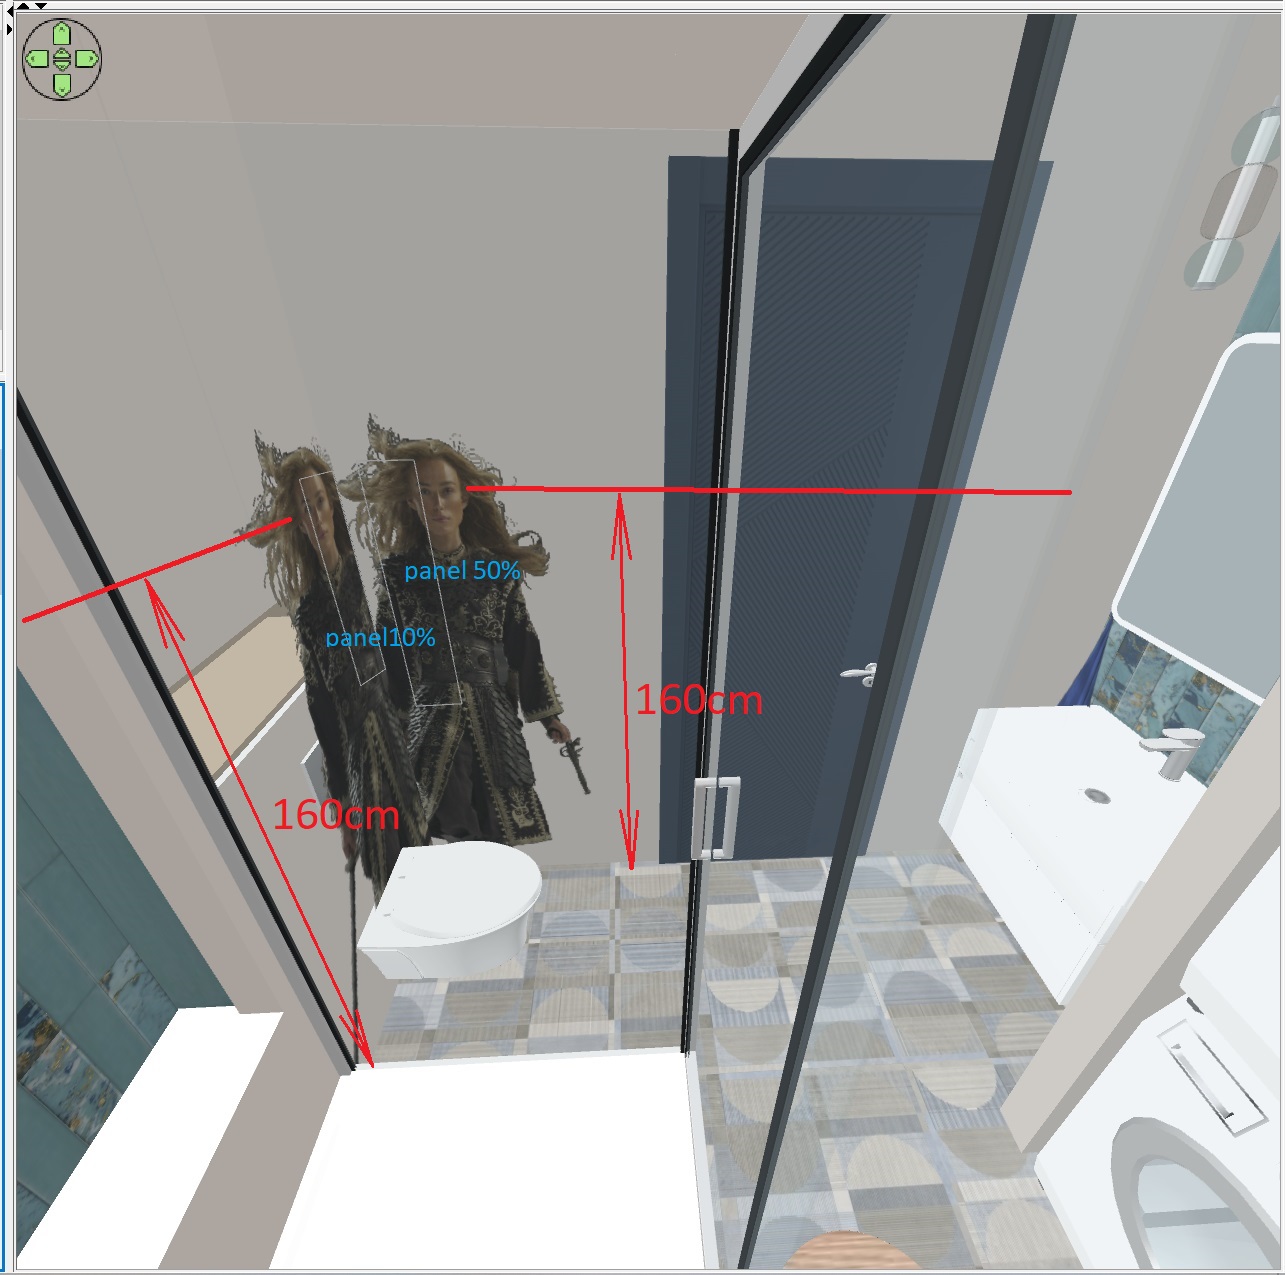
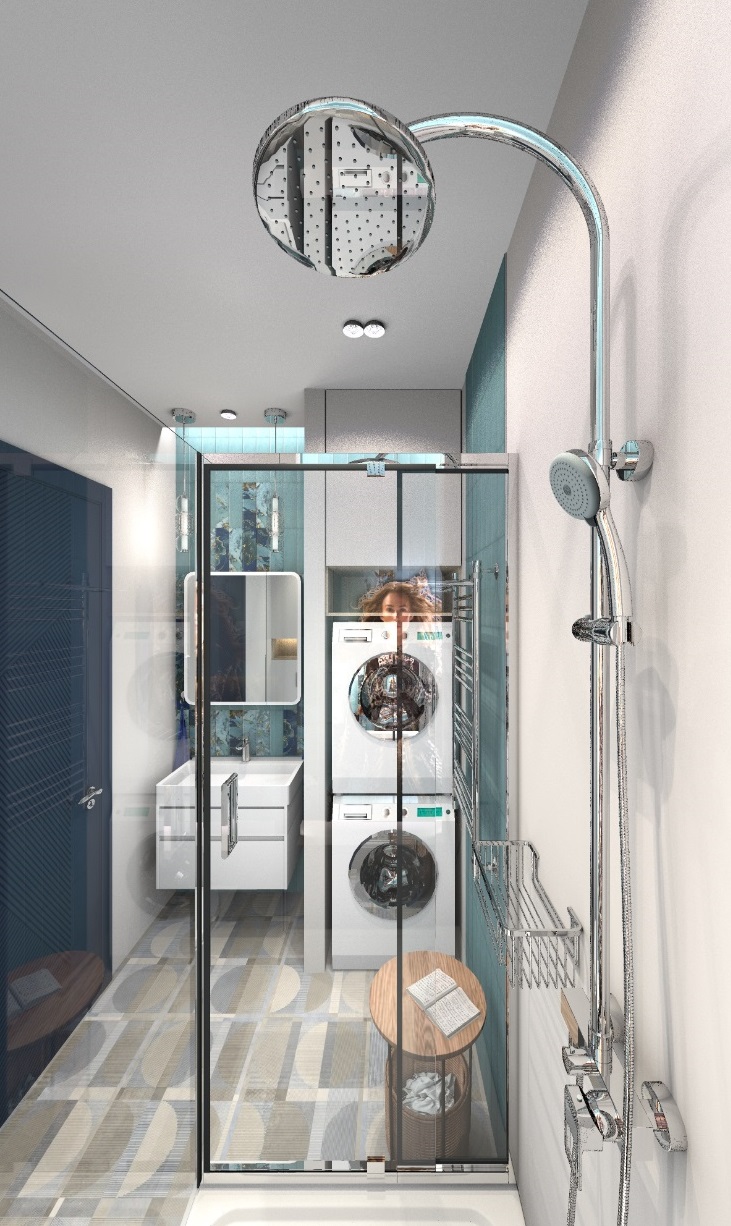
I started to build my own library of chrome products. I have created a separate polygon with green grass and a blue sky with clouds, I am testing corrected models with chrome, mirrors and glasses there. I realized that for chrome, you do not need to change the MTL file, you only need to register prefixes in the necessary groups in the OBJ file formats. I changed the MTL only if I needed to get glass, an example for working with a shower cabin, if the model was originally with opaque groups. Otherwise, MTL files are not important. Only the prefix *******d sweethome3d_window_mirror_******** works. First, I write out on paper all the necessary names (and numerical values) for the necessary groups that need to be turned into chrome or a mirror. Then I export this "wrong" model in OBJ format and open it in a text editor, enter the mirror prefix in the right places. And I'm rediscovering it on my grass range. There I already have a whole army of faucets, washing machines, towel rails, hooks, paper holders and brushes)). Sconces, chandeliers and furniture with chrome legs will appear soon. In my project, I am now continuing to work on the bathroom and filled it with new chrome items from the landfill. Now a new optical experiment. In a cramped space with mirrors, it is impossible to accommodate a viewer without a very wide angle of view. Otherwise, you will not be able to show the entire interior. I set 97 degrees for the camera, which is a lot, a normal person without turning his head will not cover such an angle. I also tried to make the effect of turning the viewer's head during inspection. Today, my audience is the star of "Pirates of the Caribbean" by Keira Knightley. The camera is almost pressed into the corner of the room, so that the two figures of the actress are practically stuck to the walls immediately behind the camera. Why are there two figures and not one? Because I need to get two reflections - turning my head to the left and a reflection in the mirror above the sink and turning my head to the right with a reflection in the glass of the shower cabin. Figures in this position are obtained in the reflection of a very small size, they are unnaturally small. To add realism, I increased Kira's height to 200cm, but lowered the box with her figure below floor level, so that her eyes exactly matched the camera's 160cm level. Kira seemed to take a step forward from her unnatural position, she is now bigger in the mirror. Therefore, she looks more natural now, as if she is the one who looks and captures the picture with her own eyes, she and the camera are now one. Another important observation. I modeled a mirrored cabinet out of walls and cylinder boxes. I assigned mirror prefixes to the cylinders and boxes in the OBJ file, I did not do any new values for the MTL file to get transparent mirror material (the indicators for the mirror from the SH3D library are very complex, Ks, d, Ni..). This is not necessary at all! Just a prefix in OBJ. The mirror turns out to be perfect. And most importantly, the overall download speed has not increased at all!! Mirrored surfaces in such a large number did not increase the rendering time. A complex multi-model image at the third quality level was loaded for 2 hours and 45 minutes. This is a great result for me!! The main thing is to give the computer a rest for a couple of hours before such work. This is now my secret to fast loading. If the computer (mine, old, dusty, buzzing) does not rest, then it can load the same thing for 50 hours, I used to just sigh and be silent, now I give it a rest for a couple of hours and enjoy a fast render. Don't laugh)))). But this is now my most important secret, I'm sharing it with you.
the figures of people in the room illuminated by panels, even if they are not visible in the frame, work perfectly together with chrome objects, there are more complex reflections in metal, metal surfaces turn out to be more interesting, with colored highlights.
Russia
Joined: Aug 13, 2022
Post Count: 233
Status:
Offline
Re: Apartment project with lighting by invisible hemispheres. I continue advertising
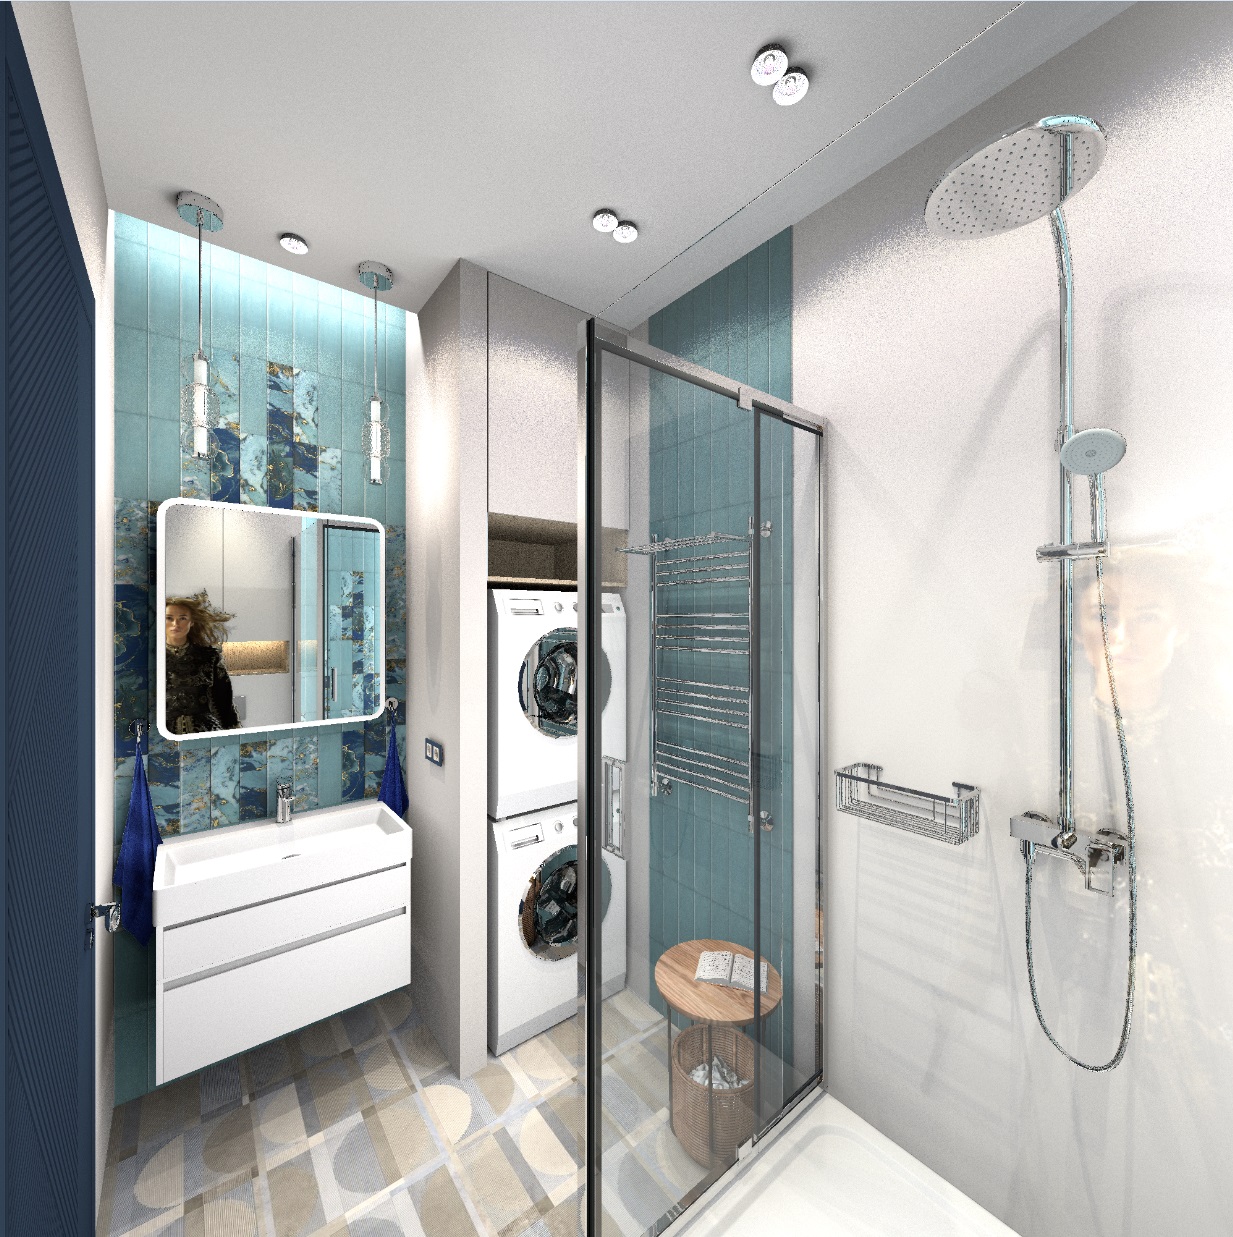
How do I add sharpness to an image? Setting up the viewer helps. The tilt of the head is 0, the rotation is a multiple of 90 degrees. Then vertical and horizontal thin slits, borders between different colors will be without a "ladder", sharpness in the lines will appear. It was the first time I tried to make a sharp vertical frame. There are many options for horizontal frames in the program settings, but sometimes a vertical format is needed. Then you can set the maximum angle to 110 and larger pixels (I used 4000x4000). Then, after loading, the square frame can be cut to width in the editor. For chrome-plated parts, a brightly lit human figure is useful, colored highlights have appeared. And only at the third level of quality do complex reflections appear in glasses, I advise you to use this level, not the fourth maximum.
Russia
Joined: Aug 13, 2022
Post Count: 233
Status:
Offline
Re: Apartment project with lighting by invisible hemispheres. I continue advertising
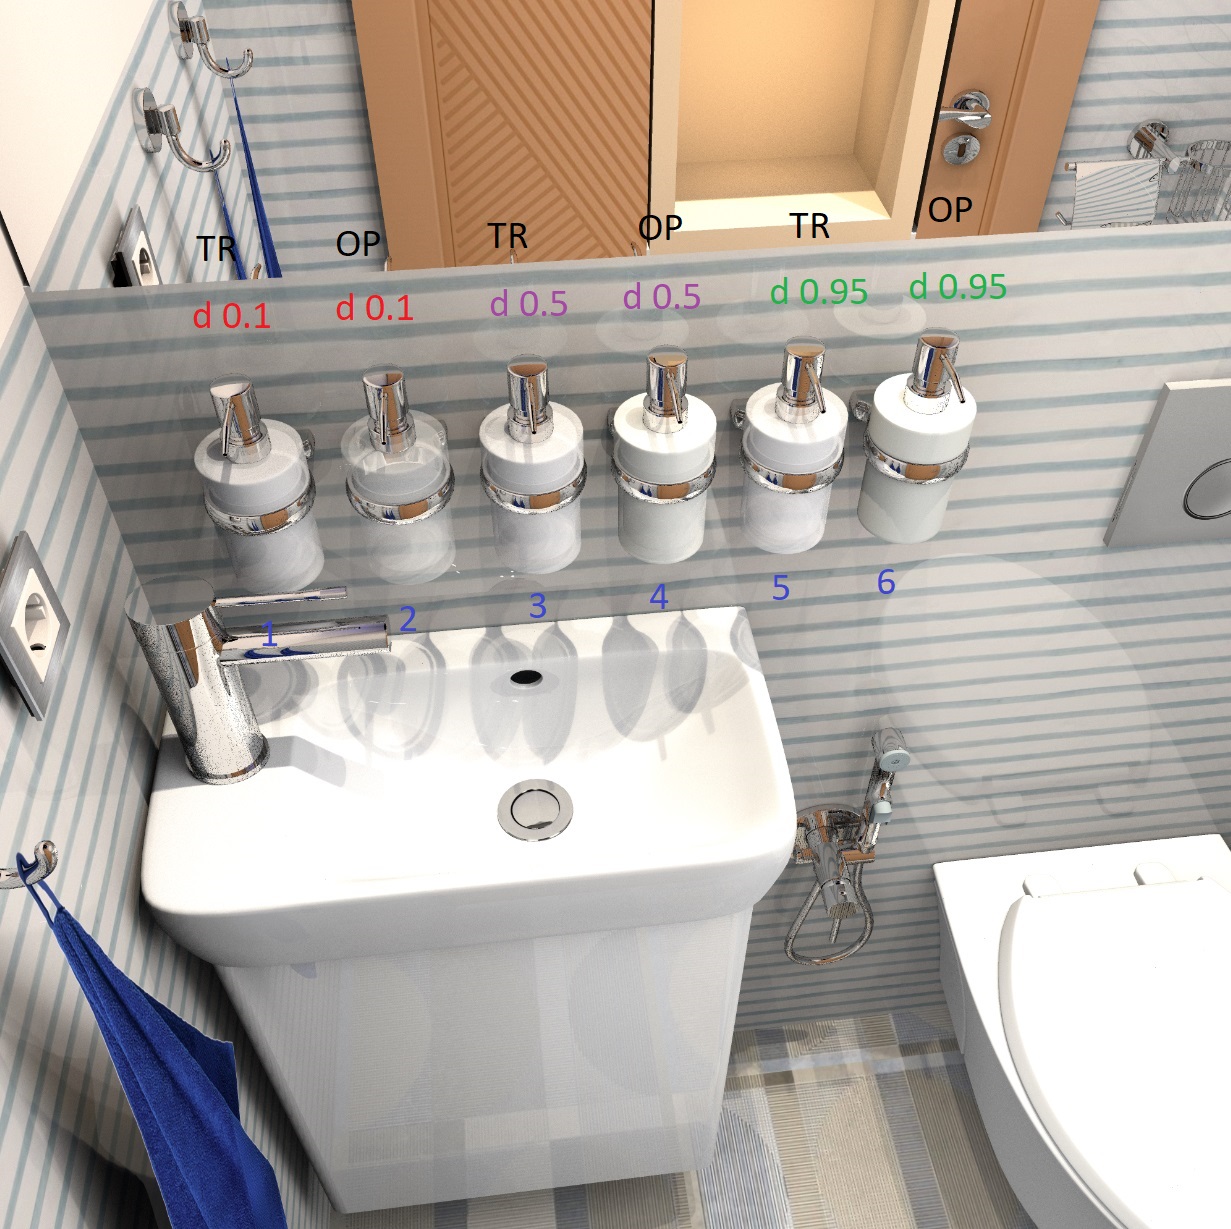
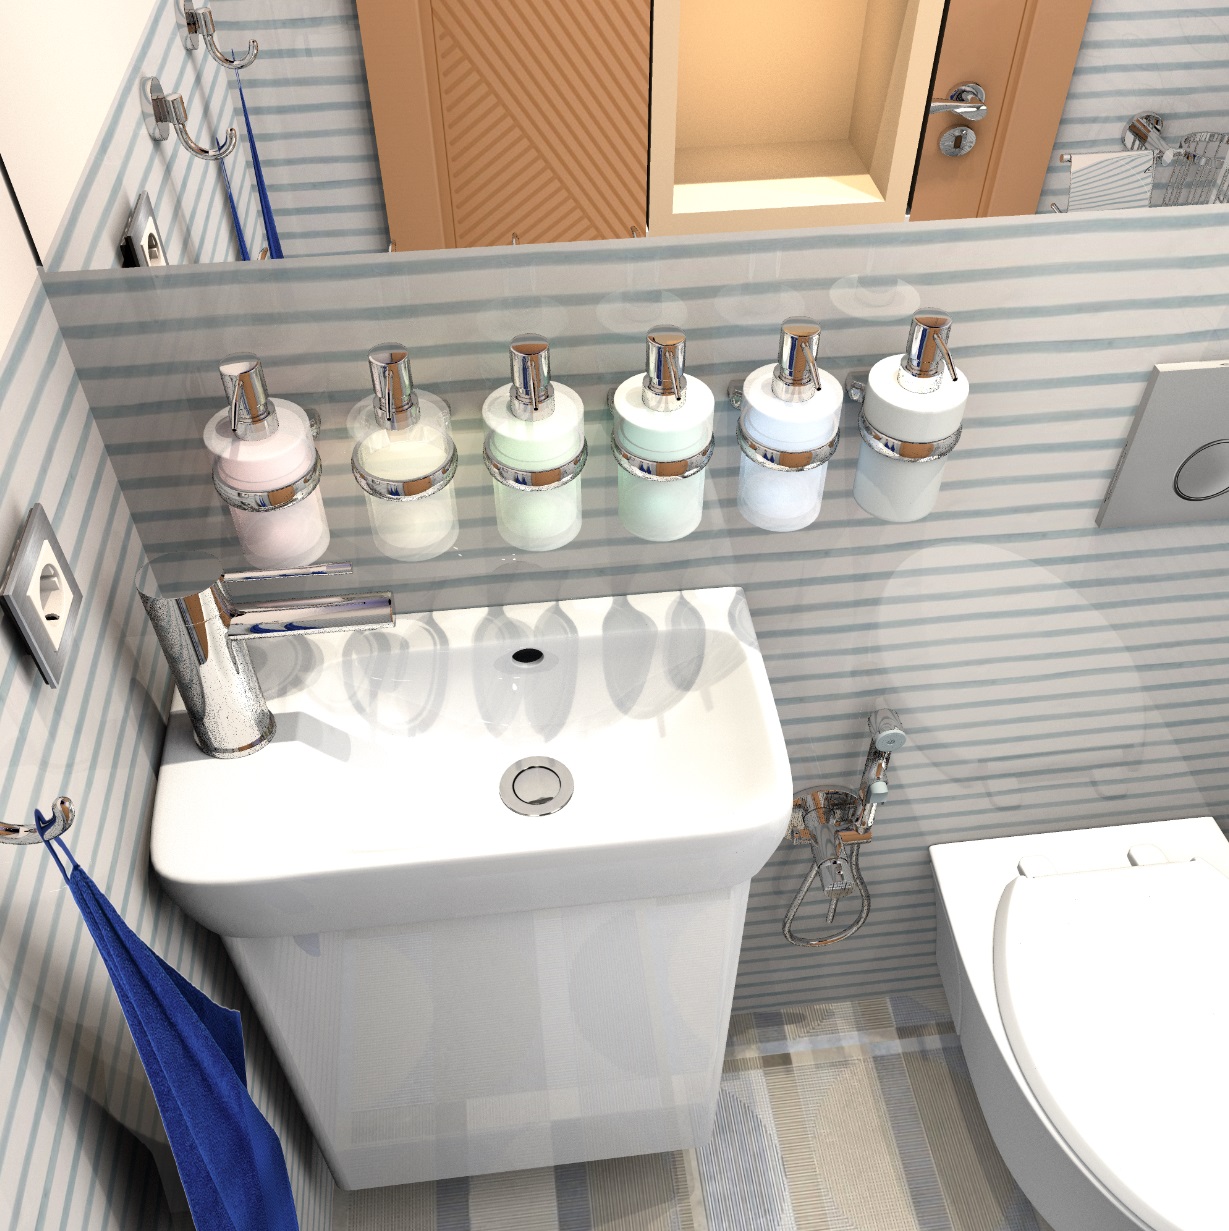
I continue to study the properties of transparent materials. I made a testing ground for the dispenser model. There are two groups in this model, which I changed in the OBJ file and assigned the mirror prefix for the first group (it turned out to be chrome), and for the second group in the MTL file I added the transparency coefficient "d" with different values. I made three options - a dispenser jar with a maximum transparency of 0.1, a jar with an average transparency of 0.5, and an almost opaque jar of 0.95. I set it out in pairs and assigned two different textures - transparent and opaque in each pair of jars. I took transparent textures here, on the advice of dear Keet https://www.transparenttextures.com /. What did I understand? The fact that transparent textures do not react in any way to the transparency parameters of the material in the MTL file. All the jars turn out to be exactly the same, similar to the parameter 0.5. Therefore, the use of transparent textures still seems to be an uncontrollable process. In the second picture, I added my favorite hemisphere inside each jar-a small tower with a power of 12%, of different colors. The task of this luminous hemisphere is to illuminate the white-painted surface of the jar from the inside. A hemisphere differs from a sphere in that it shines down and sideways. Therefore, the effect of colored smoke in the bottom of the jar is obtained in the jar. The second advantage of such illumination is the effect of a fluorescent soap solution, which removes unnecessary dark edges on the jar. This is how it turns out on real plastic shampoo cans, there are never dark edges, everything glows from the inside. I see the best effect for the average values of the transparency of the material 0.5. The coefficient 0.95 can also be highlighted, but it is necessary to increase the power of the hemisphere, otherwise the light does not penetrate outside. It turns out to be an imitation of white plastic. Transparent white textures (TR) are installed on dispensers 1,3,5. Opaque white textures (OP) are installed on dispensers 2,4,6. The backlight inside the jar with texture, not color, solves two tasks - it simulates an opaque liquid and removes unwanted dark edges on the shape that are not visible in reality. If you make the backlight very powerful, you get a bright lamp, you don't need to overdo it. If you assign a color to a jar, you get just a transparent glass, so you need to assign the texture of the desired color.
Russia
Joined: Aug 13, 2022
Post Count: 233
Status:
Offline
Re: Apartment project with lighting by invisible hemispheres. I continue advertising
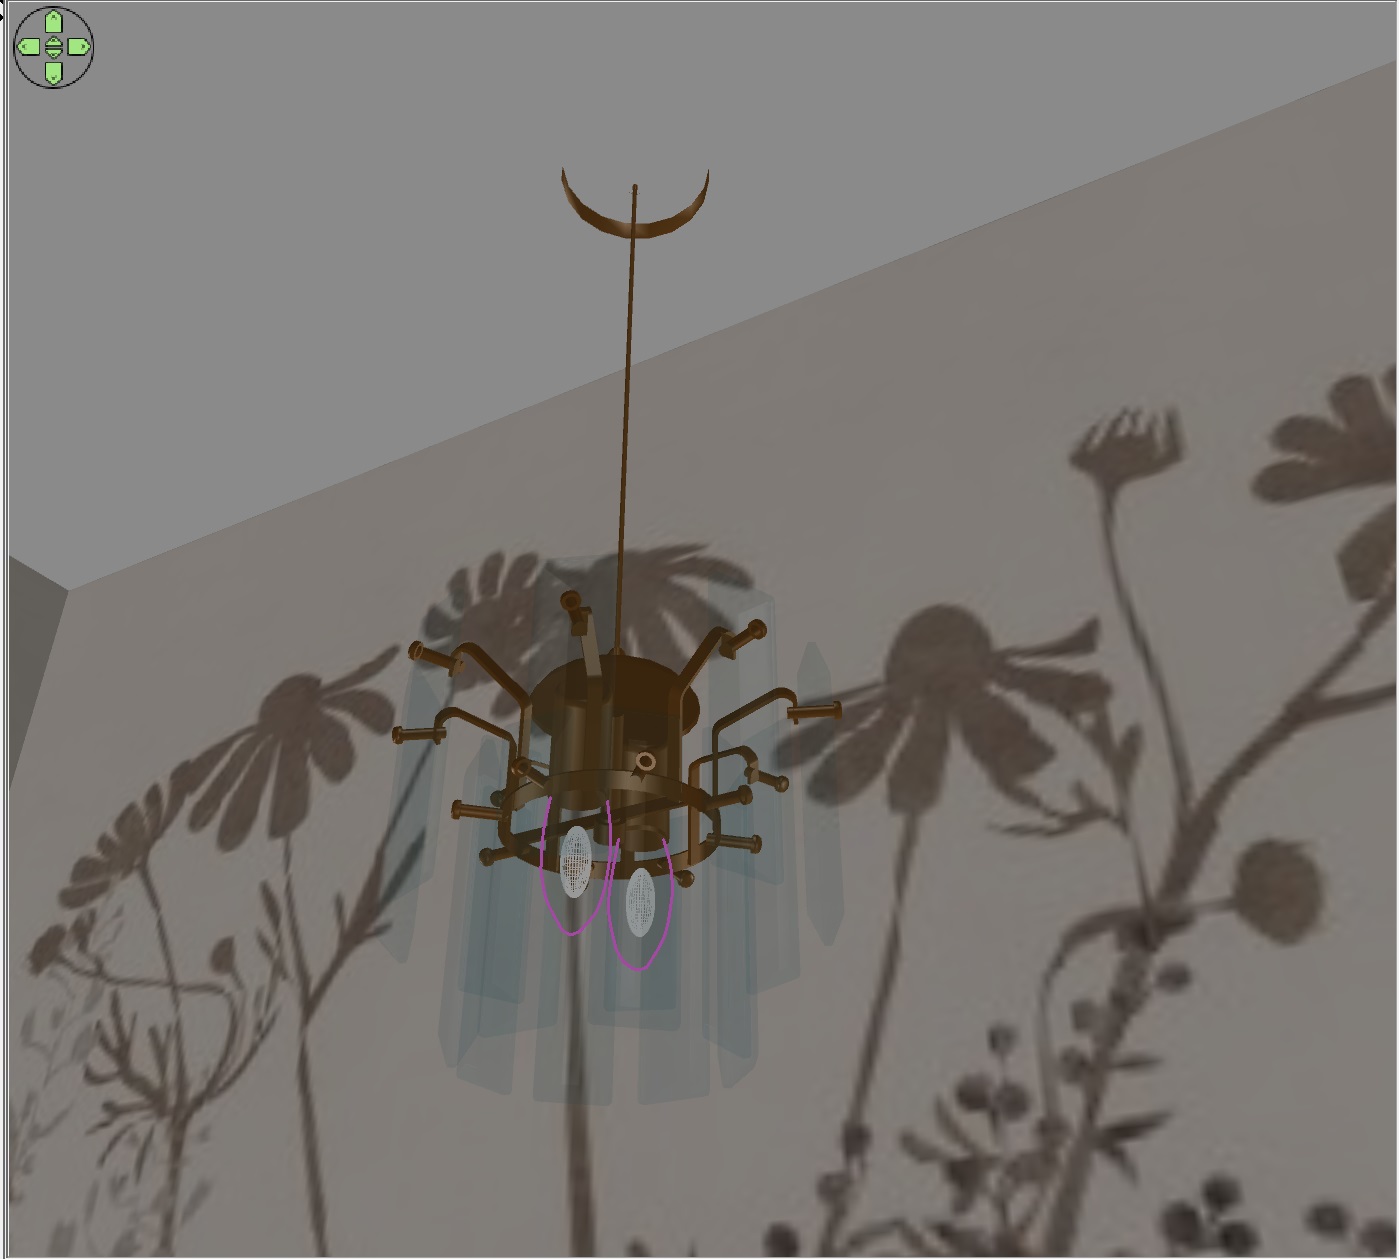
I learned how to make natural matte bright light bulbs in lamps. Often models have such ready-made light bulbs, sometimes they are opaque, sometimes transparent. Based on the experience of studying the dispenser, I assigned a transparency coefficient of 0.1 for the bulbs in the MTL file. Now you need to carefully place a sphere of the desired shade of color inside the bulb, I left 50% power. I wrote the Mirror prefix in the OBJ file to the metal parts of the lamp and assigned the dark brown color in the model settings. The render turned out to be polished bronze. The light bulb got a white texture and became a matte white. If the light bulb is opaque in the initial model, then you can not correct it in MTL, but assign a transparent white texture in the model settings. It's basically the same thing. The light bulb will have a shape and will look white matte. And most importantly, it will shine like a real one! Bright and powerful, casting shadows through glass pendants.
Netherlands
Joined: Apr 8, 2022
Post Count: 790
Status:
Offline
Re: Apartment project with lighting by invisible hemispheres. I continue advertising
You might find this site helpful: https://www.colorhexa.com It has all color codes for use in your objects. You can enter a name like "gold" or "ivory", or a #hex code in the search box to find your color. It also supplies the XYZ codes for the color, the codes as used in MTL files. No need to convert a #hex code to those numbers if you want to enter a color code directly in a MTL file for the Ka value. The site also provides alternatives, colors that are slightly different but could be a better fit for your objects. And finally it also shows scales with different shades, tints, and tones for a color.