Russia
Joined: Aug 13, 2022
Post Count: 233
Status:
Offline
Christmas tree, detailed instructions on how to make it))
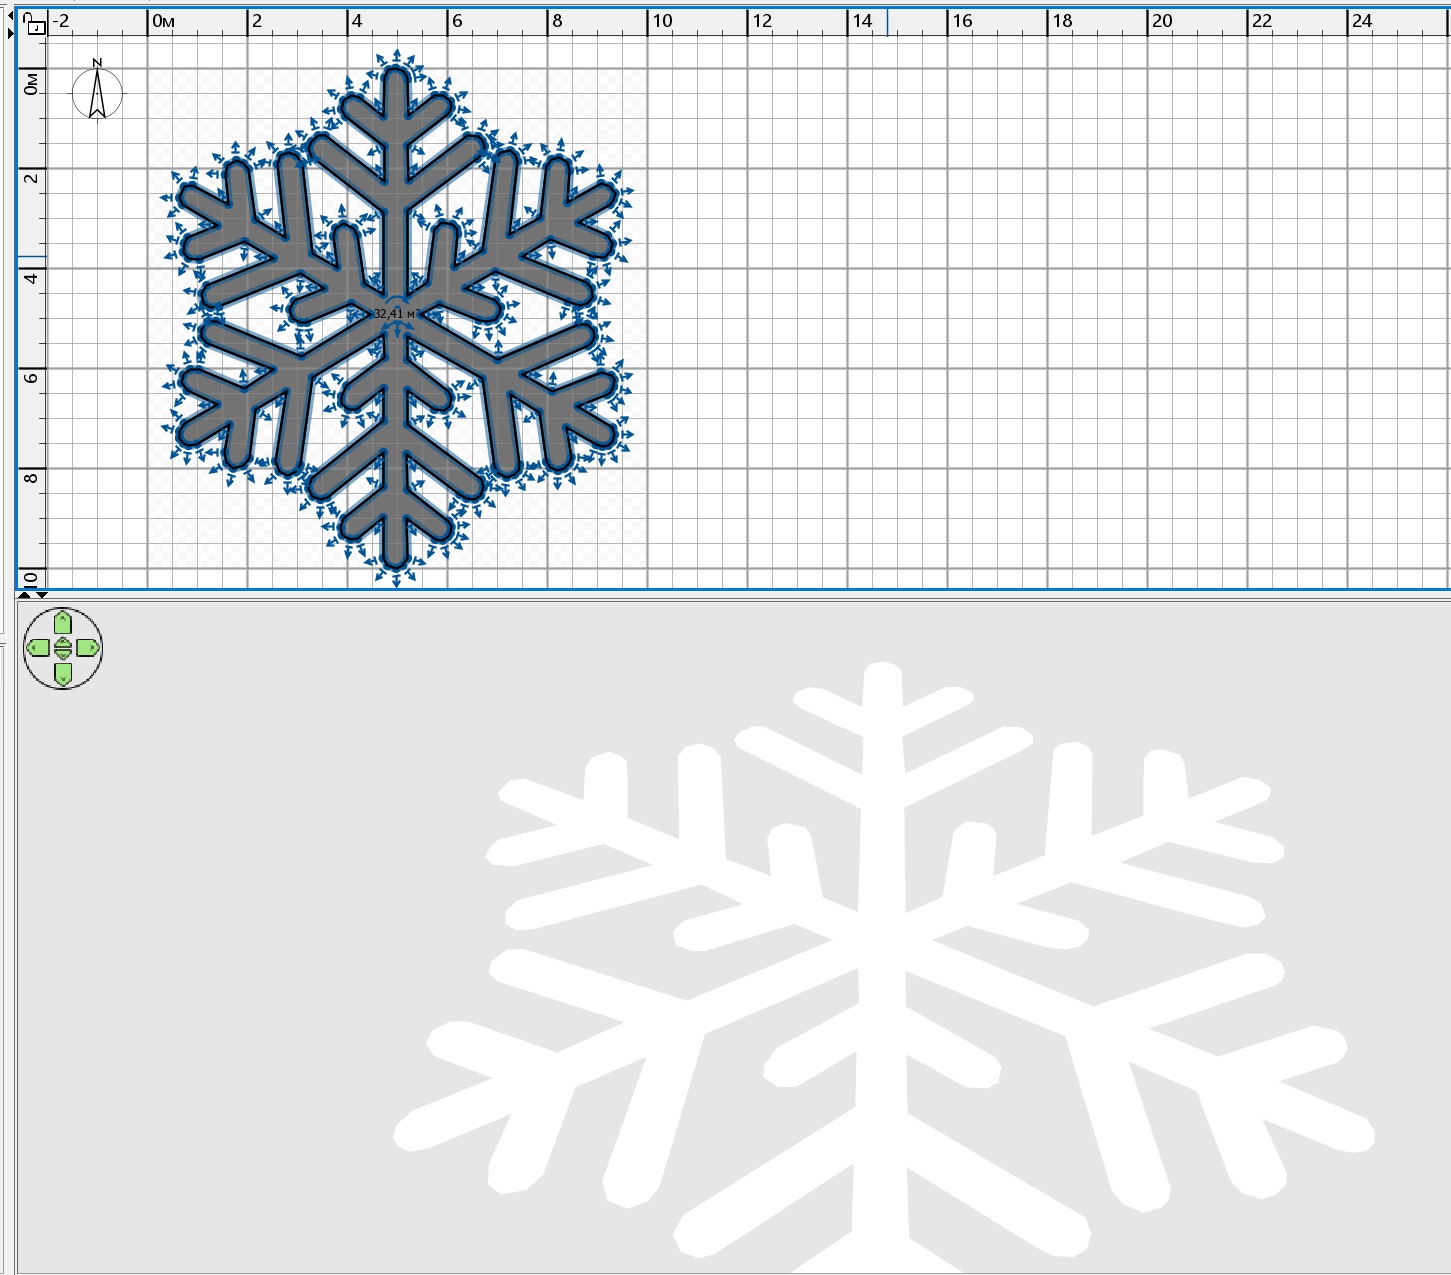
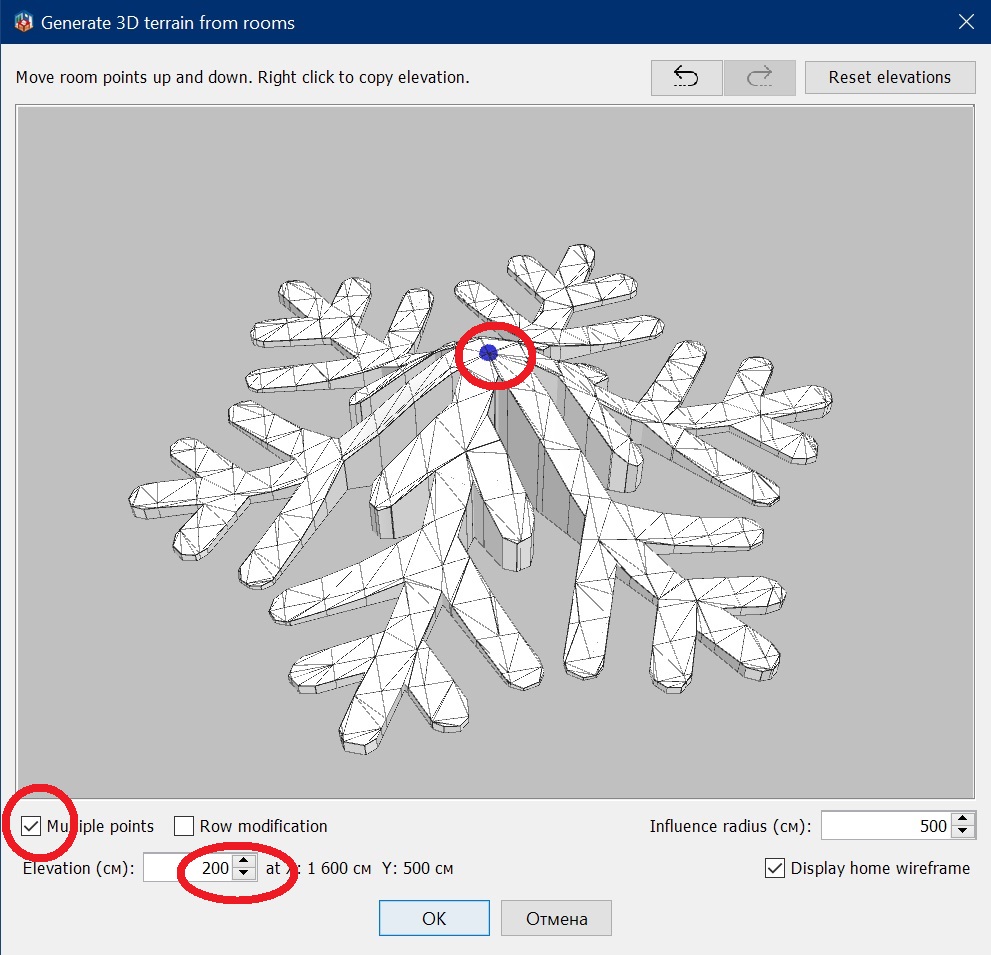
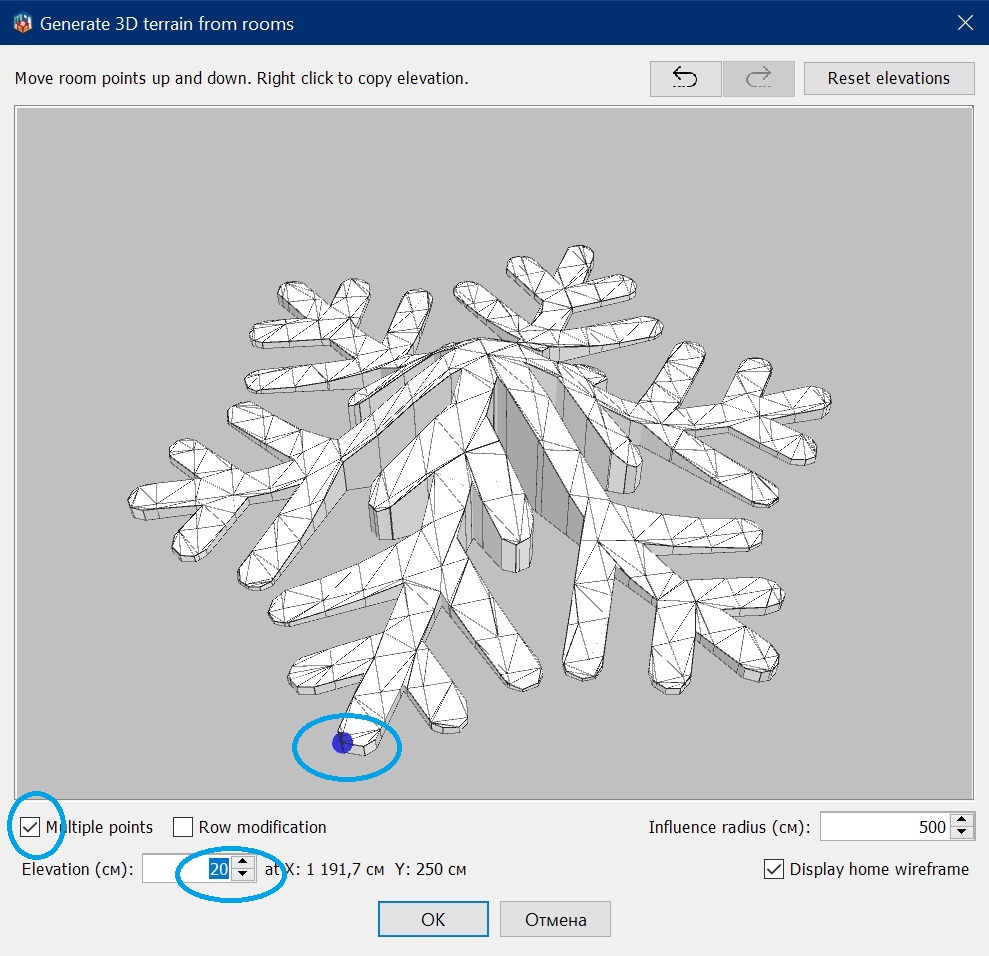
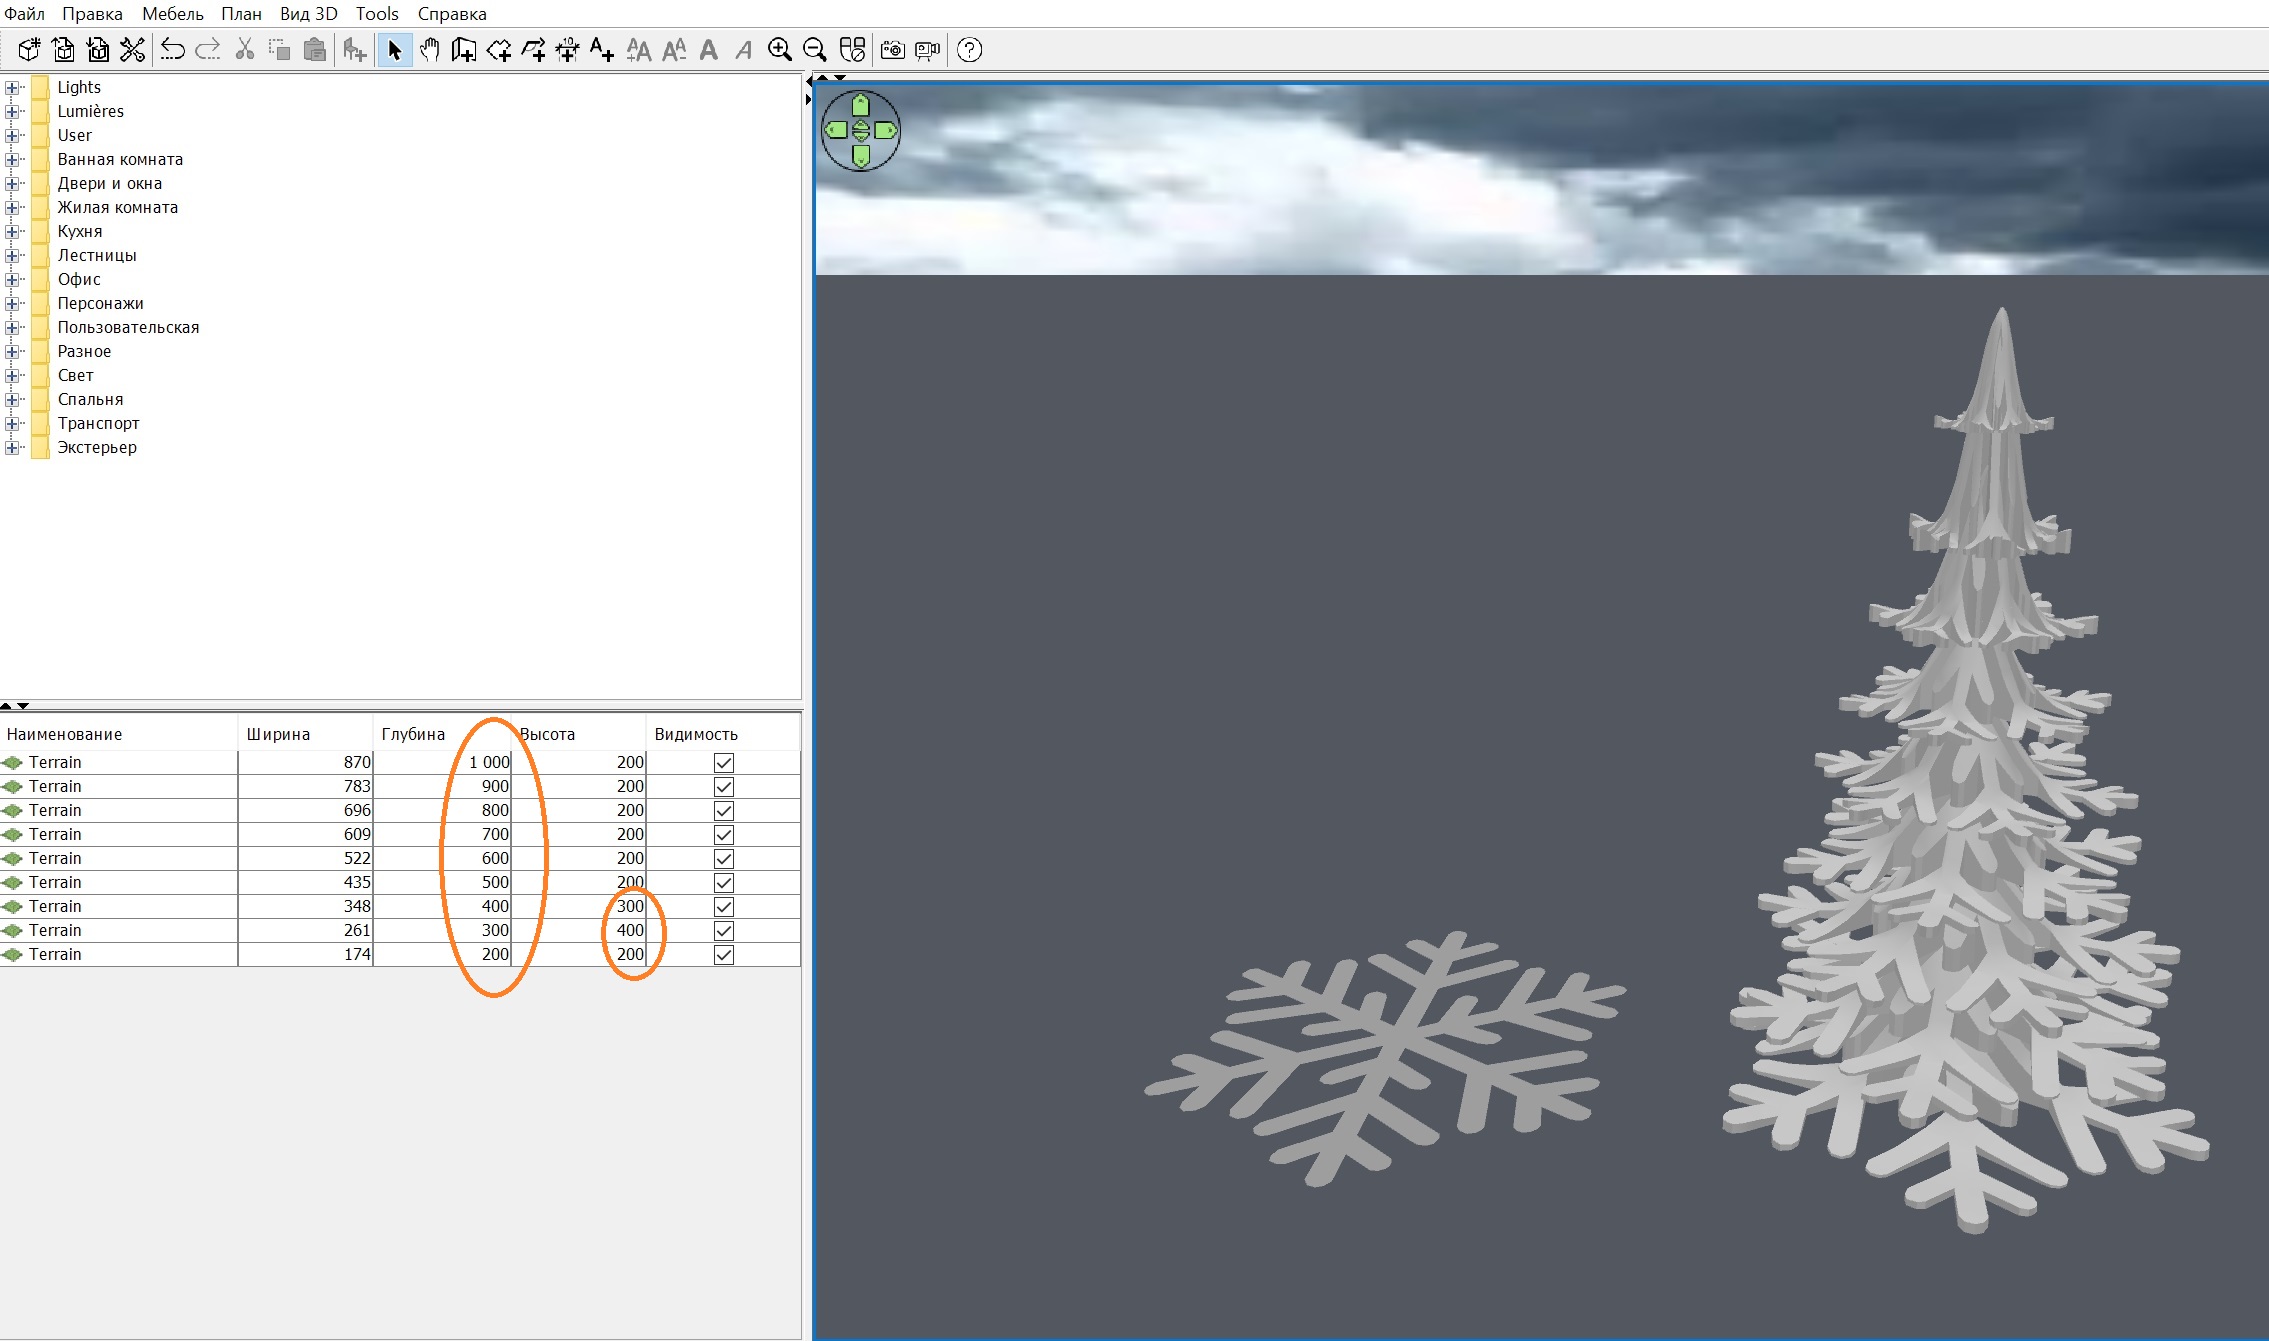
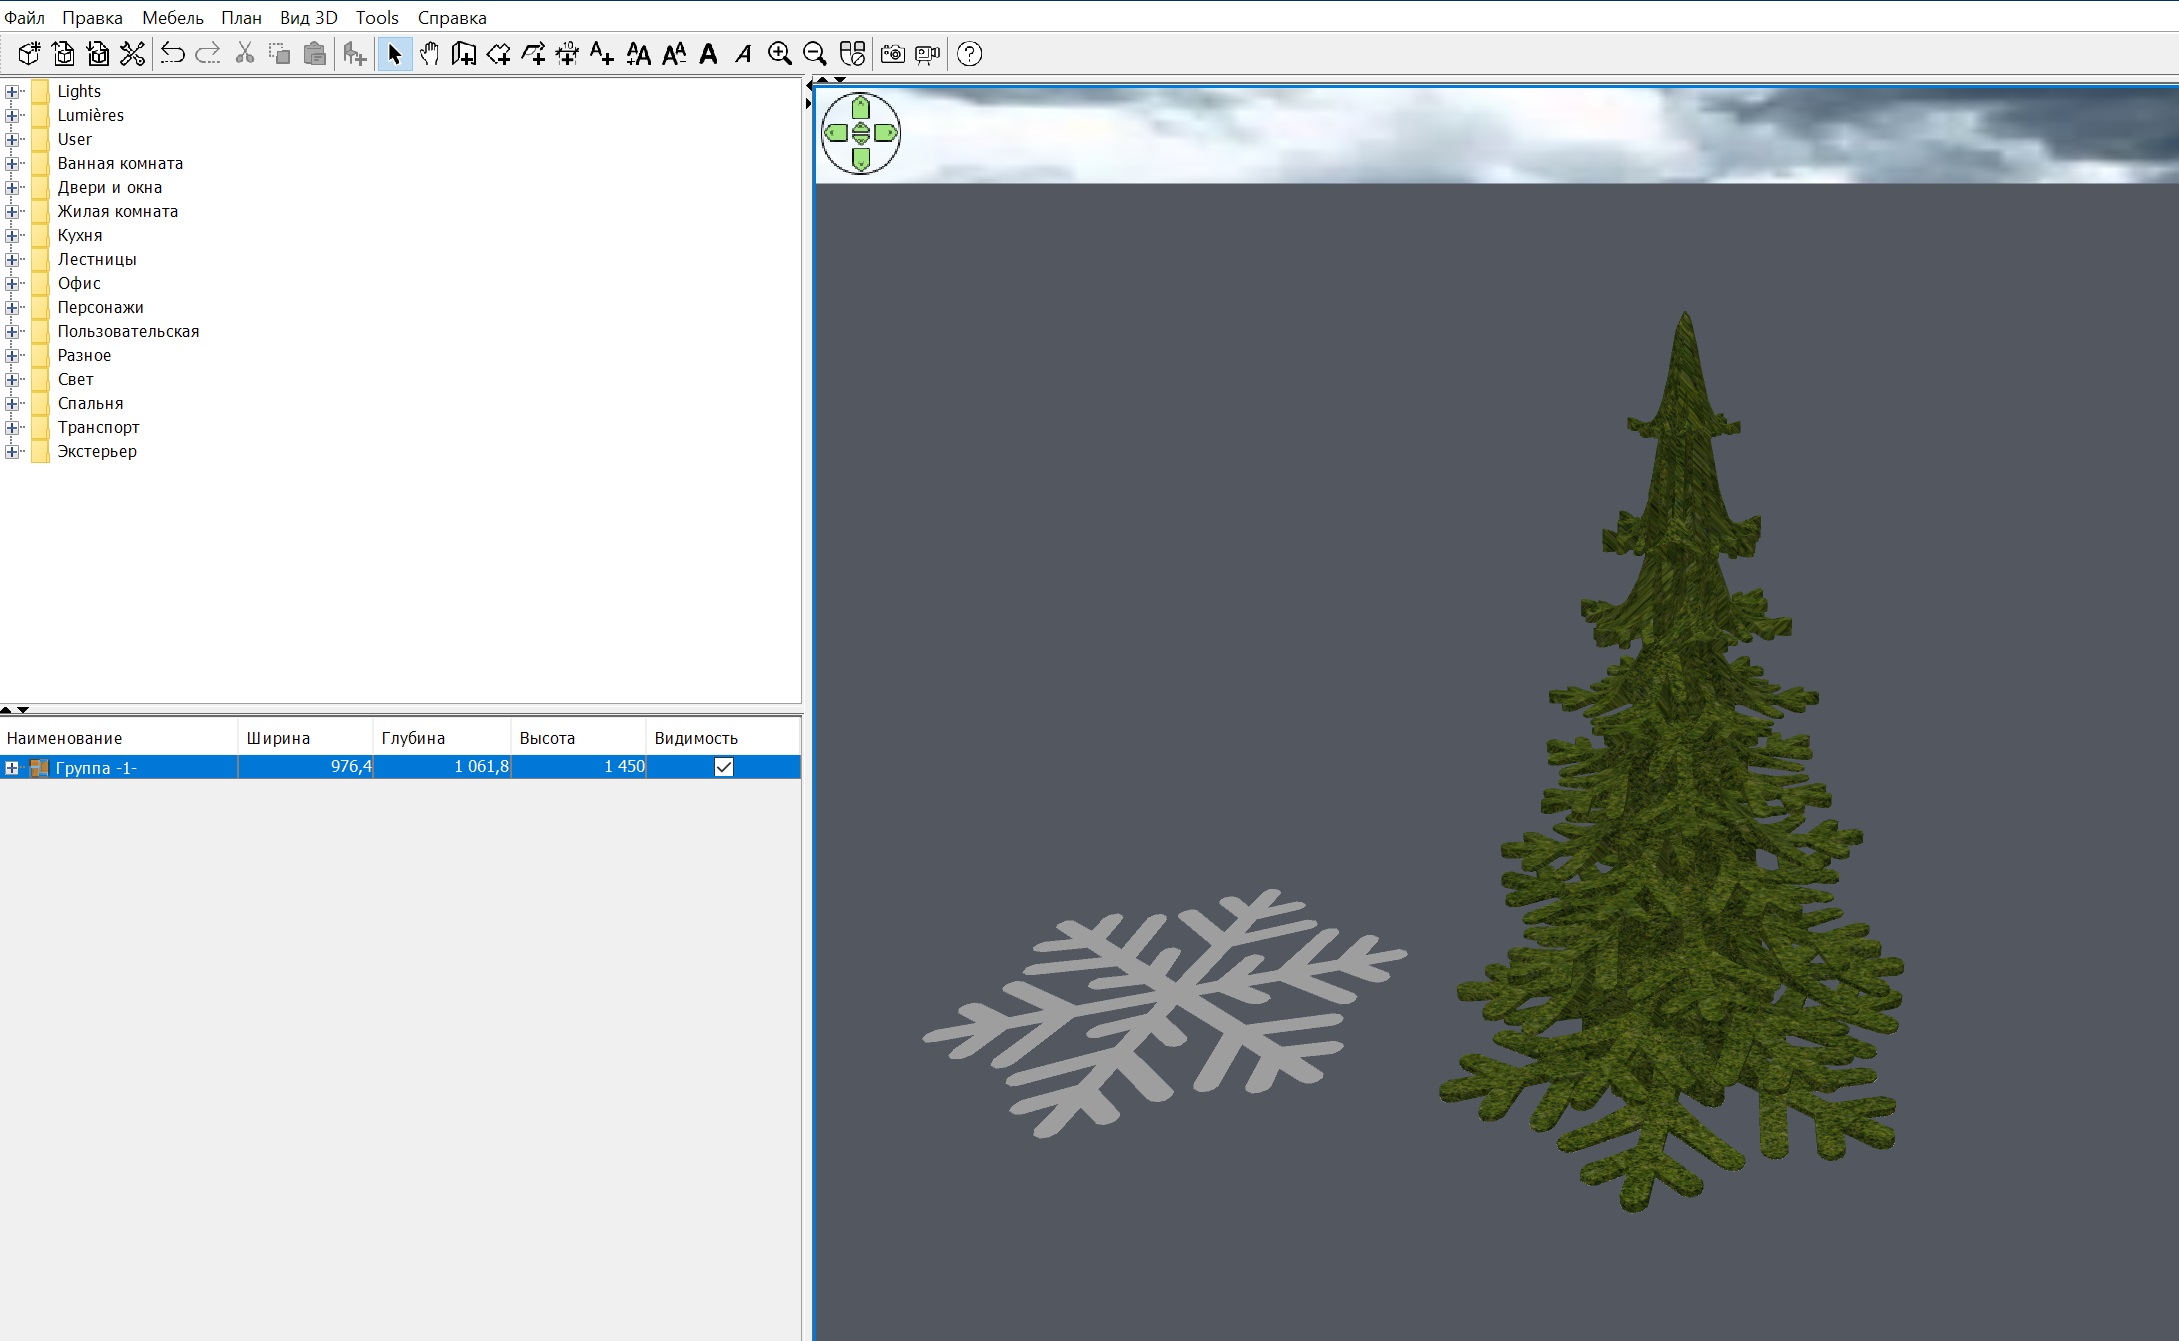
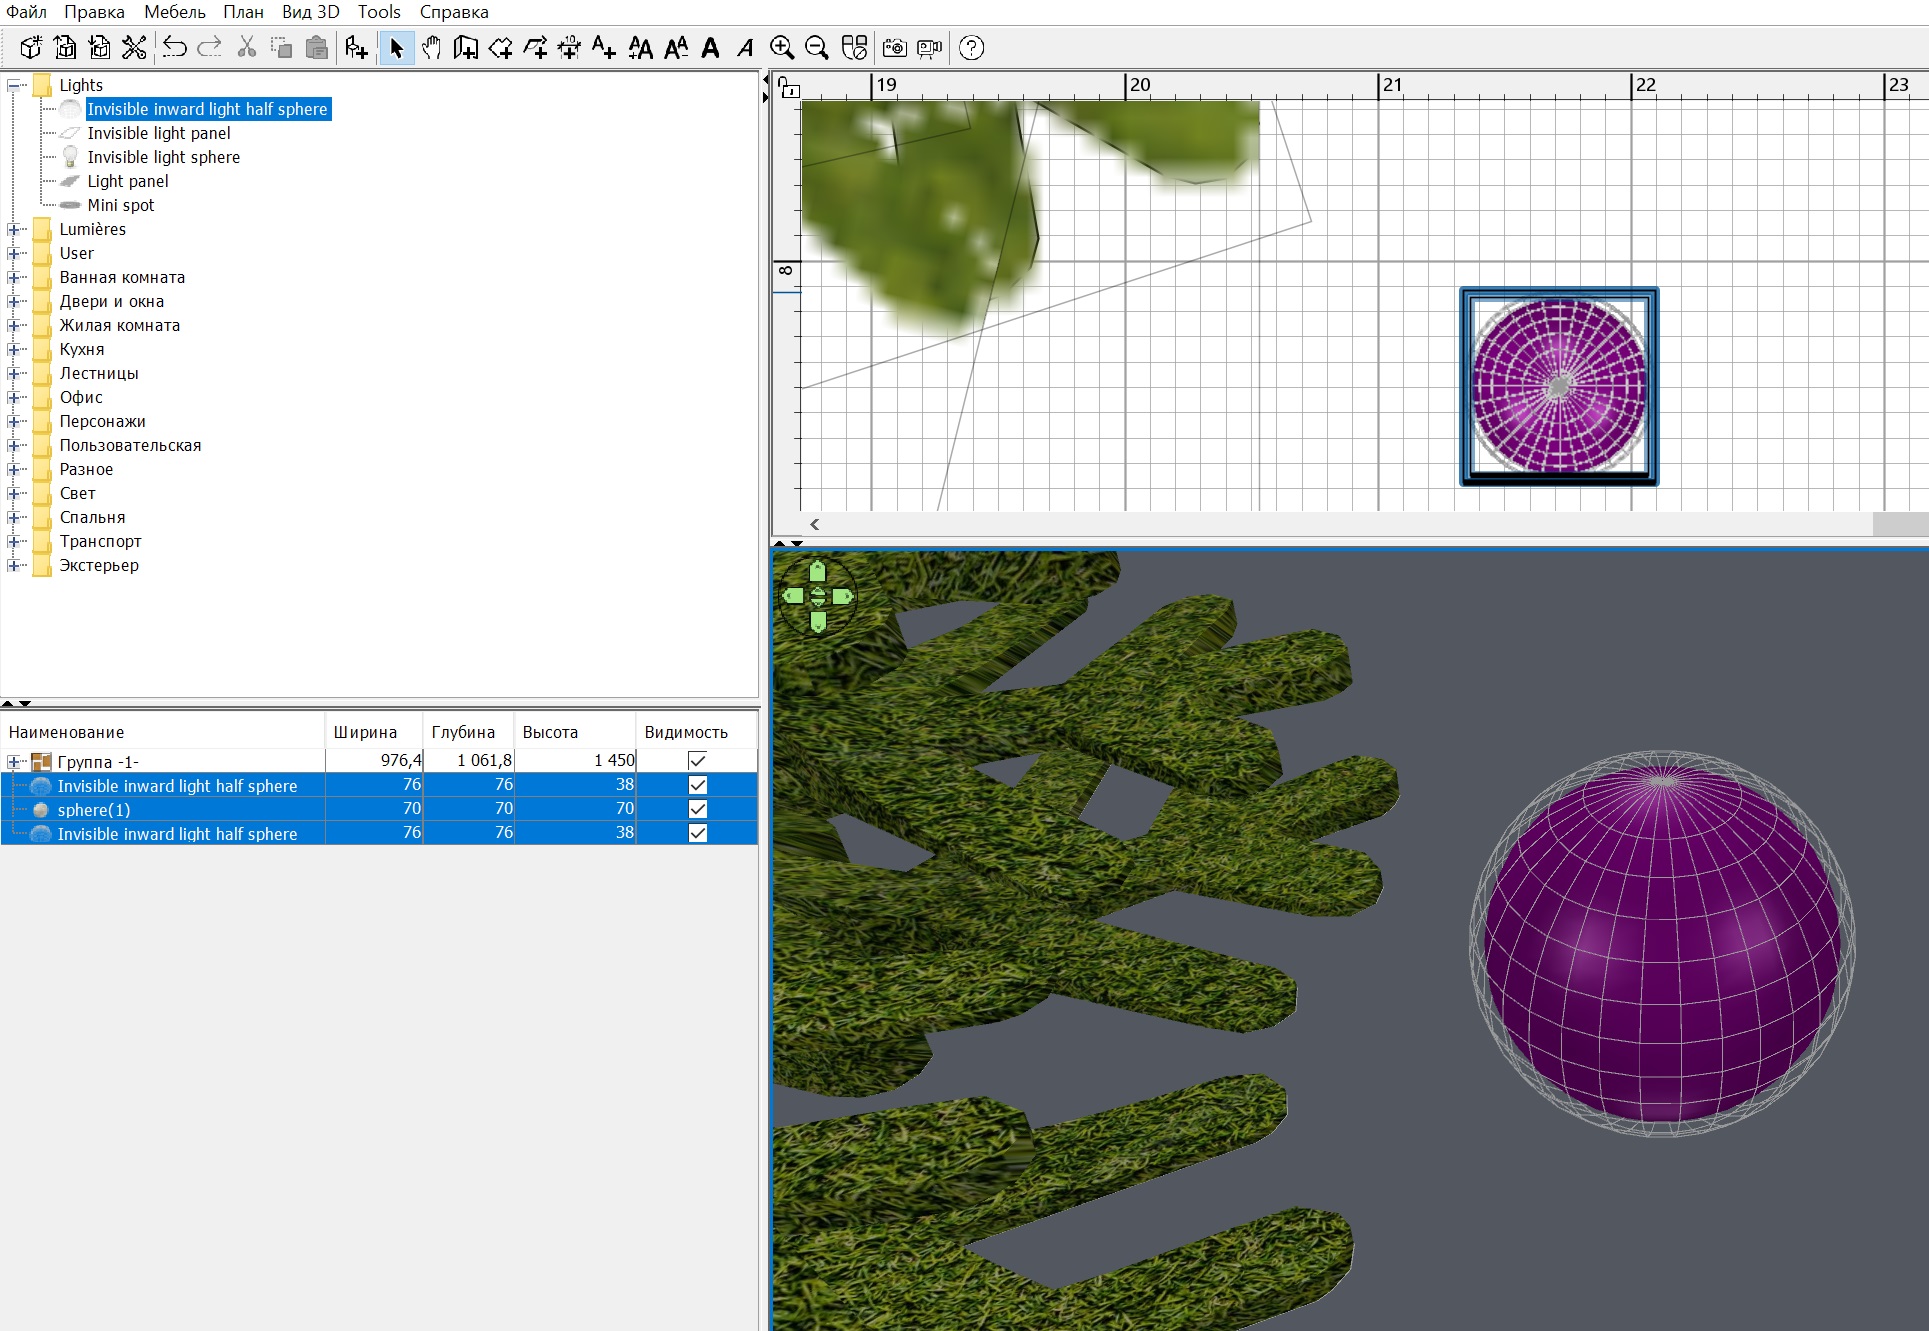
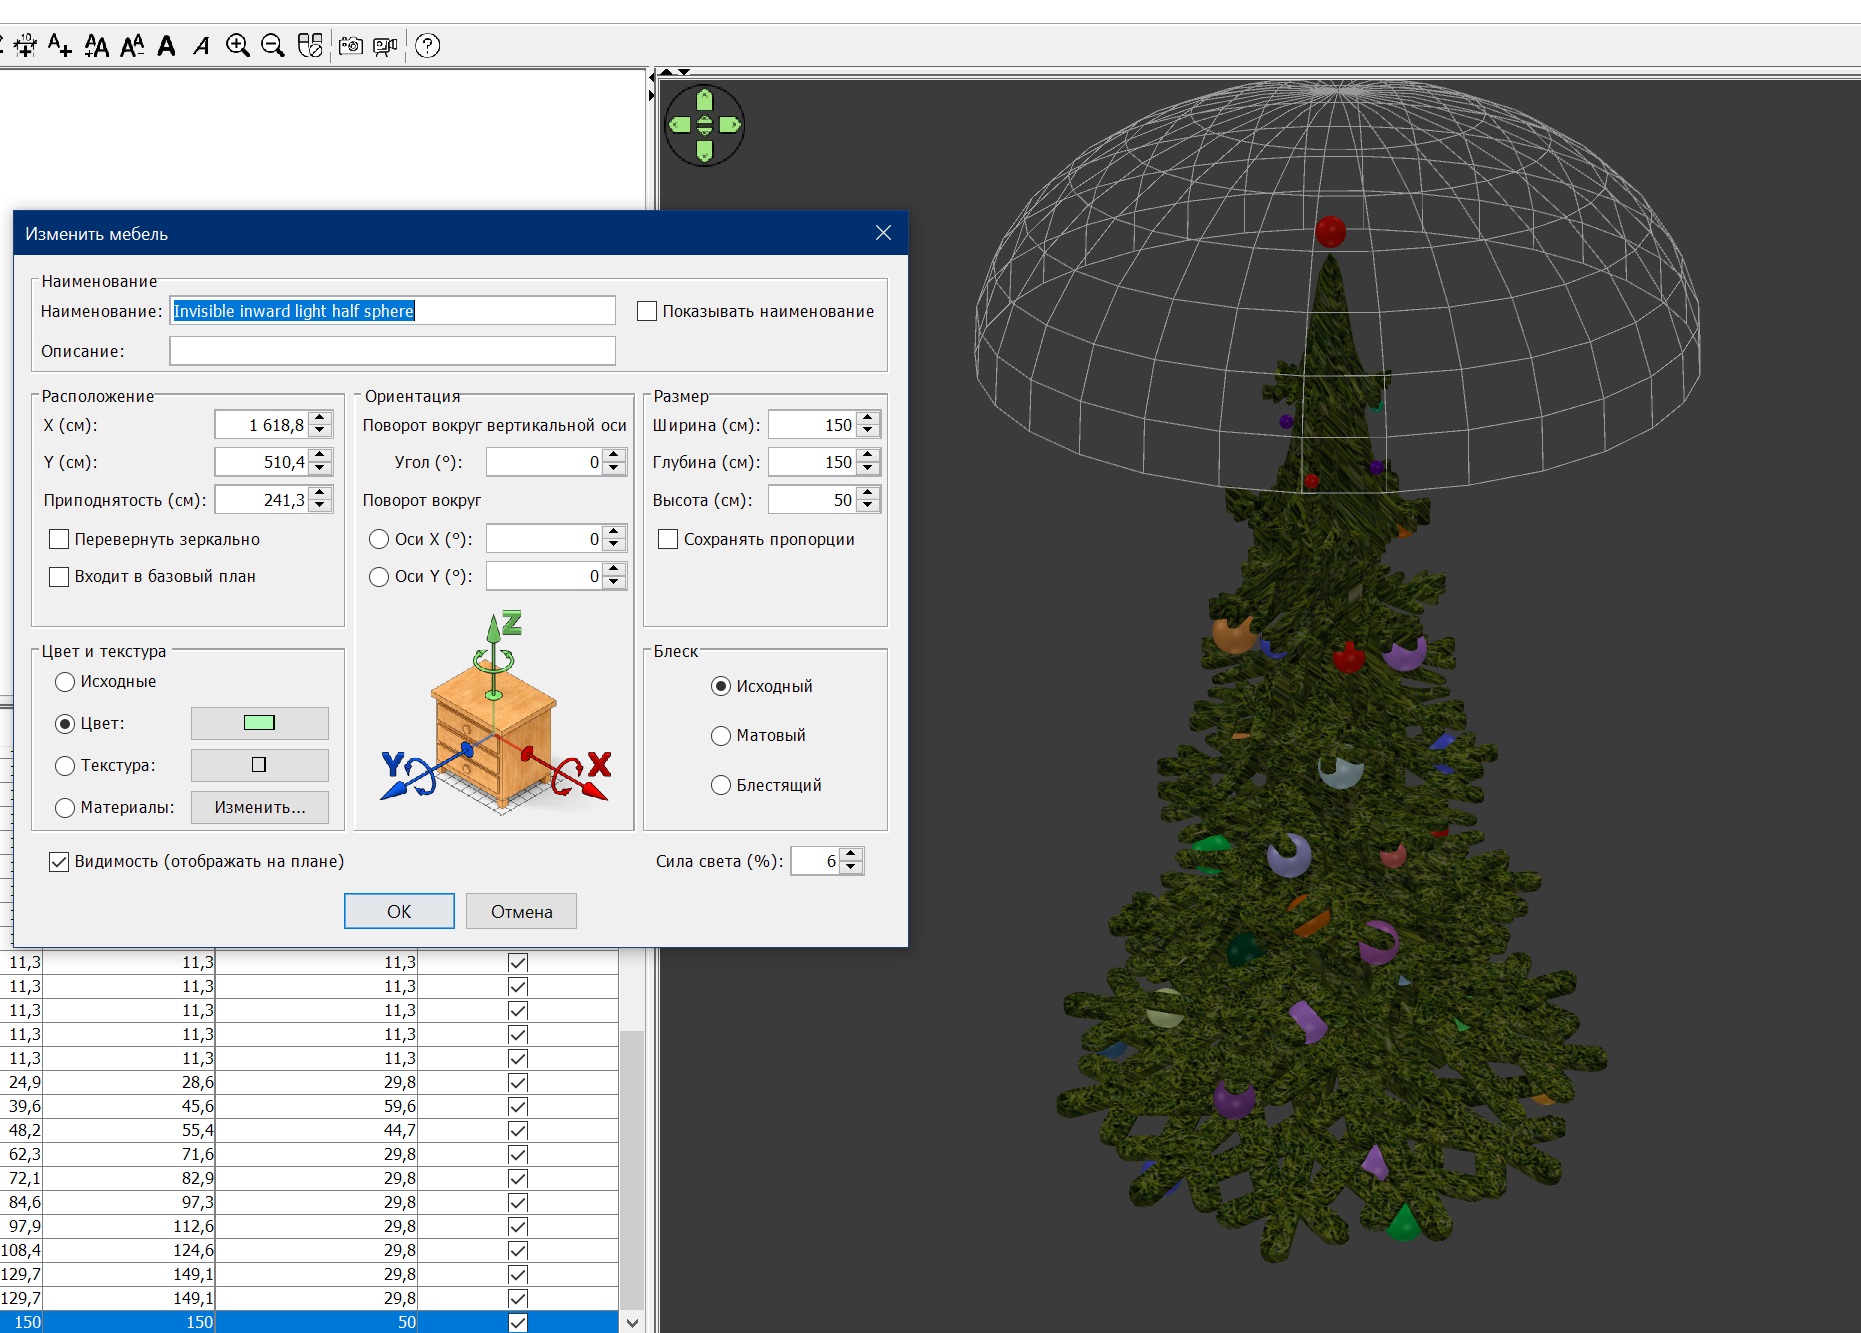
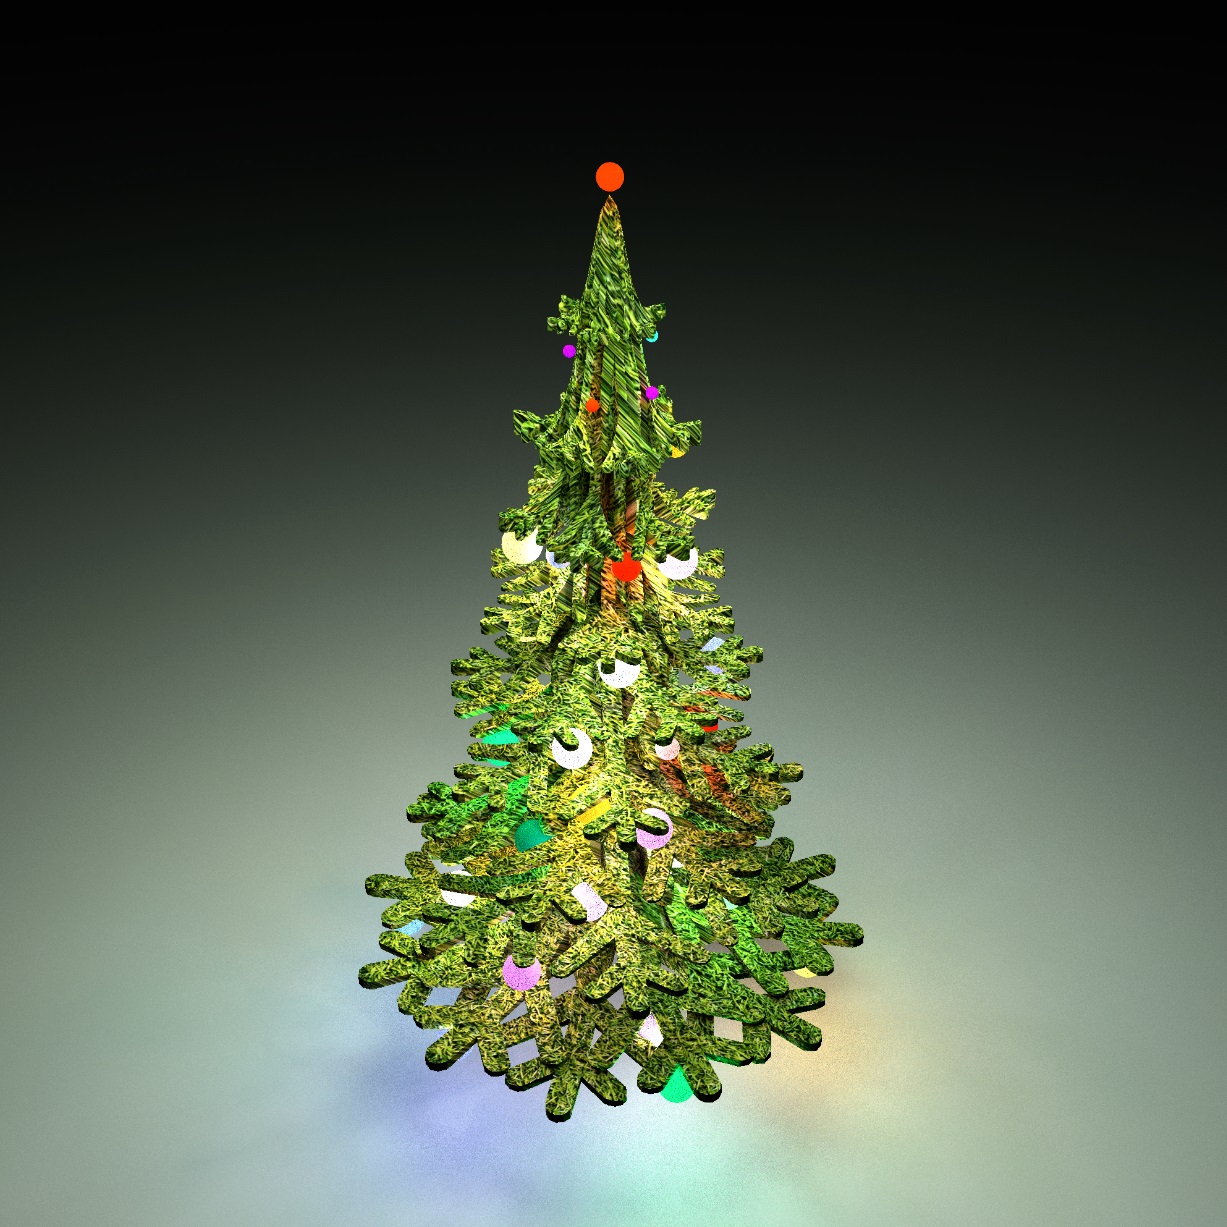
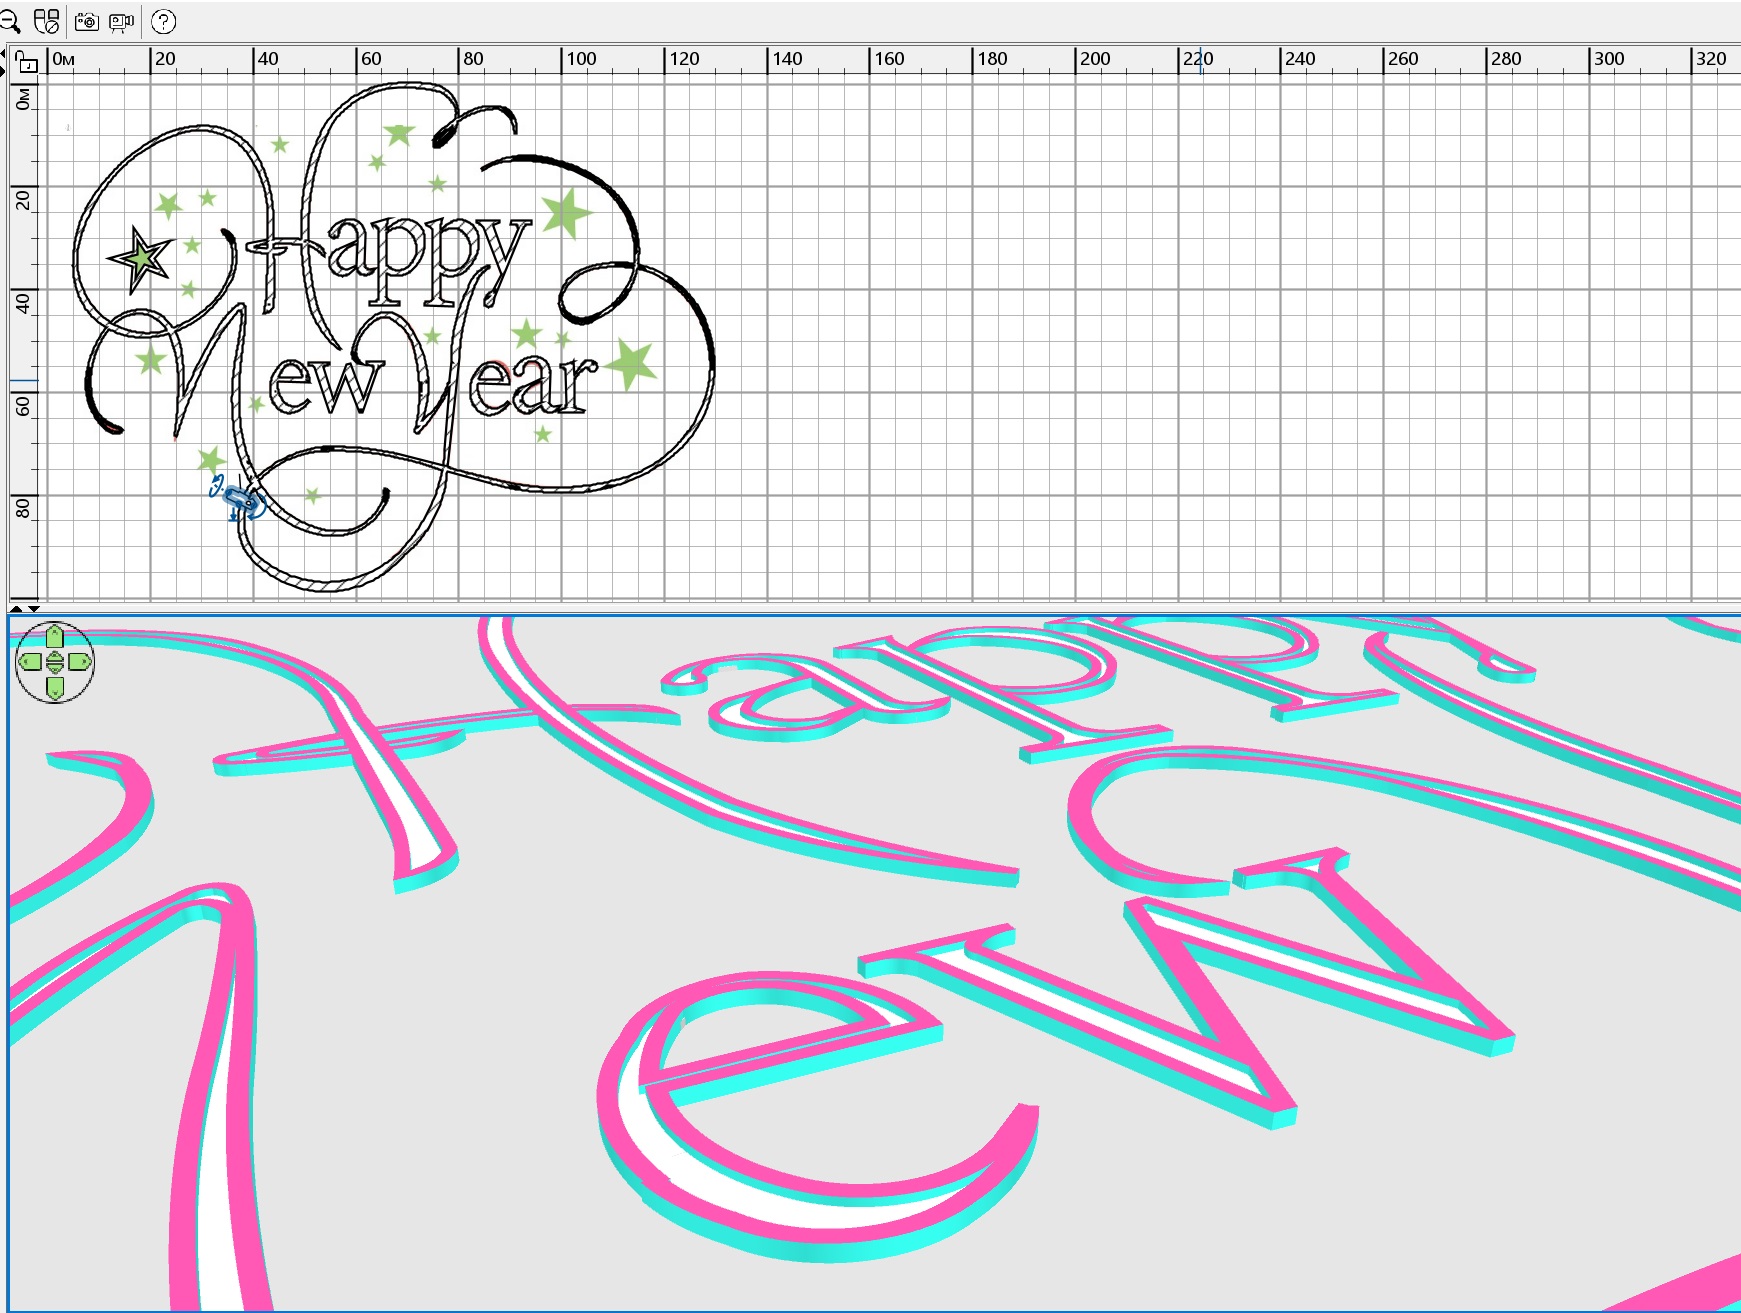
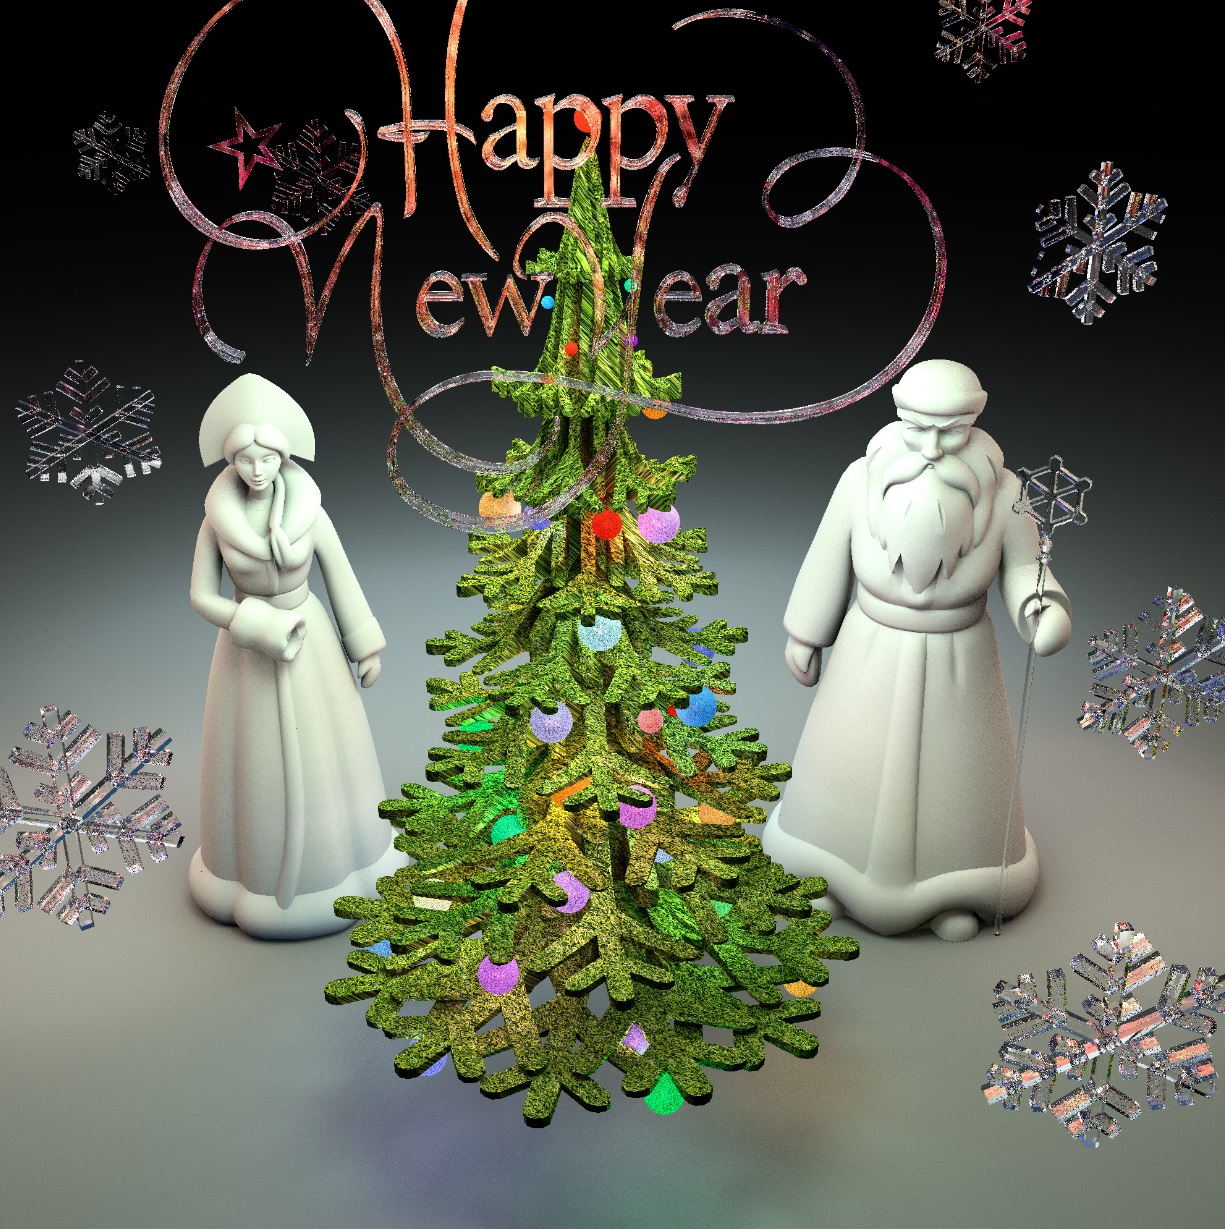
Hello everyone, New Year and Christmas are coming soon. It's time to prepare the Christmas tree. You need to download a very useful Landscape Generator tool. Right here https://www.sweethome3d.com/support/forum/viewthread_thread ,10995 Then you need to pick up a picture of a snowflake and set it as a background image in the plan. The size of this image is 1000 cm. You can do even more. The larger the size, the more interesting it is to change the shape of the model, the grid will be more frequent. Draw a room along the contour of a snowflake, and it won't take more than 10 minutes for you and me. select a room in the form of a snowflake and click on the TOOLS button Generate 3D terrain from rooms.Then you can change the flat snowflake to a three-dimensional one. Poke the center of the snowflake and set the height to 200 cm. Be sure to check the box on Multiple points. lift all the tips of the snowflake a little, give them a height of 20cm then you need to copy this volumetric snowflake model several times and set the excess for each new model to 150 cm more than the previous one. Align all models in the plan. Assign all models some kind of even size, for example 1000 and 870. and then in a row in snowflakes, start reducing the large size by 100cm. Put the top two models more creatively so that you still get a sharp milestone of the Christmas tree. you can continue to work with such a giant tree, and assign a 3000-scale grass texture to the model. But if you need a Christmas tree for your home, then create a group and keep the proportions to give a height of 220 cm. Note that after that you need to change the texture scale to 1000. Now comes the hard part. If you left a giant size of the Christmas tree, then make a 70cm ball. And install two hemispheres 76x76x38cm around the ball. Take a calculator, do everything exactly so that the hemispheres connect into a ball and get a smooth lumen. Yes, the lower hemisphere should be rotated 180 degrees along the Y axis. The power of the hemispheres is 30%. Group this sphere+2 hemisphere system into a group. There's not much left. These groups with balls need to be hung on the Christmas tree, and each group should be given its own color entirely. The ball will turn colored and the hemispheres will also shine with this colored light. Make as many of these balls as you want, I made 36 balls of different sizes. Remember that the groups need to be changed while maintaining the proportions, otherwise you will get eggs. And in the end, you need to cover the Christmas tree with a large green hemisphere with a capacity of 6%. Set the color white for the ground (it's snow), assign a height higher than the tree for the viewer. Lift the tree off the ground by 40cm. It's just like in life. that's all! Merry Christmas and Happy New Year!
Russia
Joined: Aug 13, 2022
Post Count: 233
Status:
Offline
Re: Christmas tree, detailed instructions on how to make it))
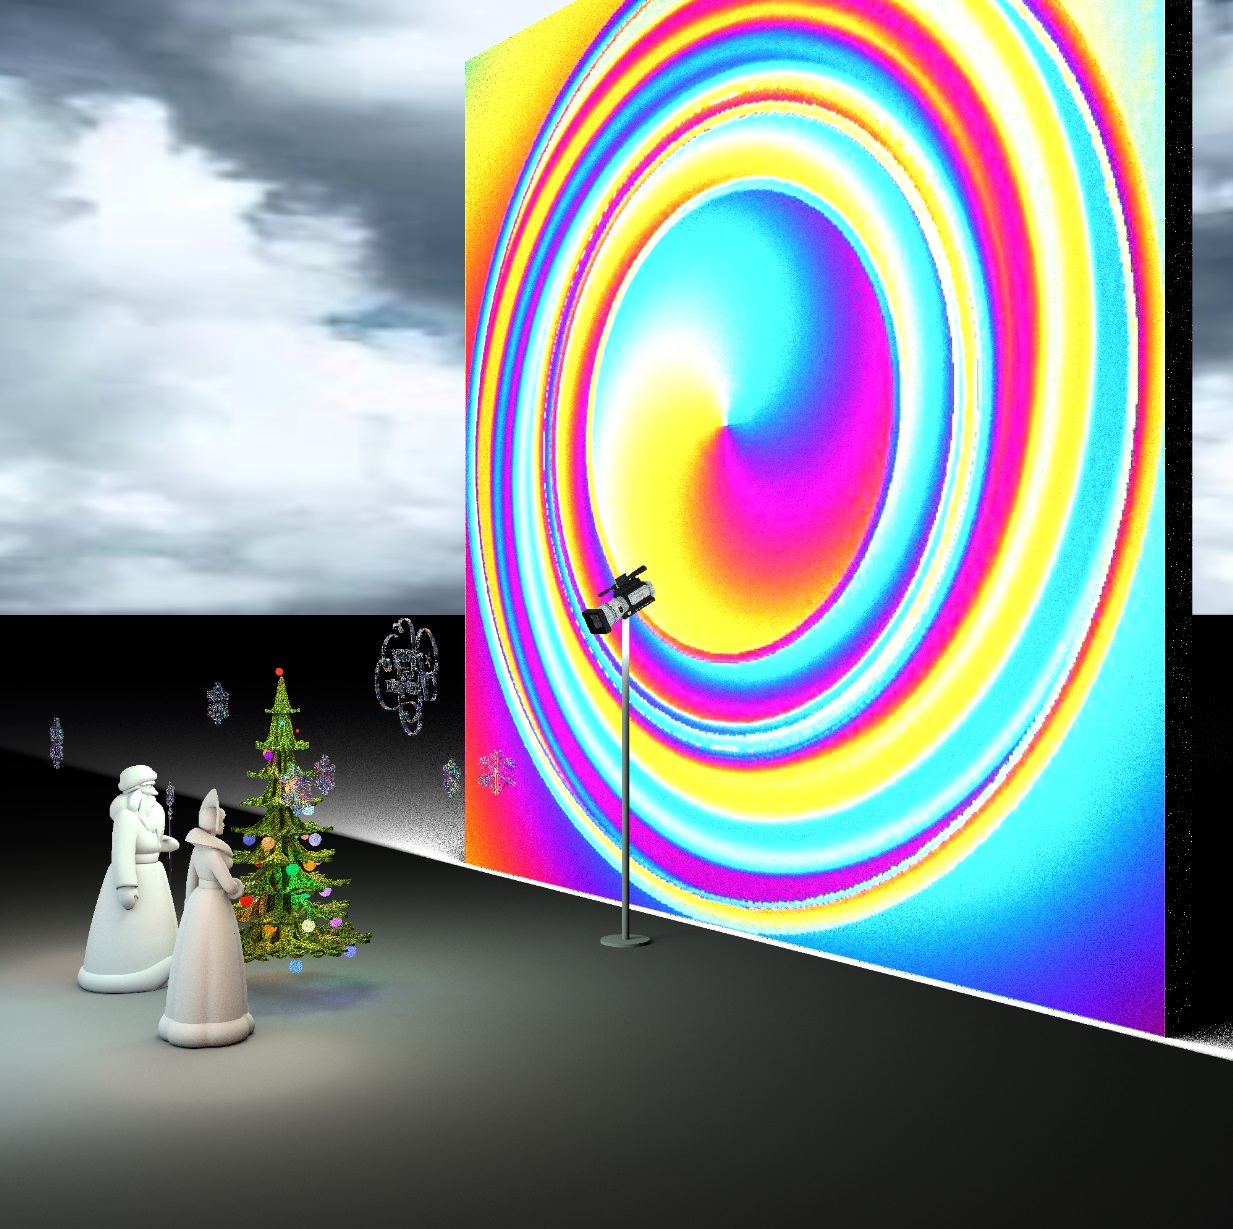
A little digression. Many years ago, I graduated from the Architectural Institute. And like many stupid students, he went to work as an artist. My paintings were selling poorly, and my young family needed the most basic necessities. And so I ended up on television and started working as a production designer. It was a shock even for a graduate of the architectural institute. Try to imagine. The audience gathers in a small studio, but these happy viewers see out of the corner of their eyes some rusty trusses on which beautiful fabrics are stretched. But real viewers all over the country only see beautiful fabrics!!! And the more expensive the program is, the more cameras it can afford. And for each camera, an ideal ANGLE with a heavenly view is built. And there's a rusty horror in the back. This is the principle of television. There is only a FRAME. Everything else is secondary. I remembered my youth. And I tried to do the job like 30 years ago, yes, my beard has been below my knees for a long time..)) So. I made the necessary inscription with the help of the walls (first the outline, then half the filling inside). I saved this model in OBJ, having improved the maximum transparency of the walls. then I cynically used a snowflake pattern. And I outlined it with walls, and also saved everything in OBJ with maximum transparency. Both the snowflake and the inscription were rotated along the X axis by 270. I'm worried. Oh Great GOOGLE. Don't let me down. Translate everything correctly. And now look at the final picture. Both the inscription and the snowflakes are equally transparent, made of ice. BUT WHY is HAPPY N Y glowing orange?!! About Google. Act efficiently. Because this is TELEVISION! There can't be a viewer behind the camera!! There is a 10x10 meter steel structure there. And the background is stretched, brightly highlighted. In reality, searchlights perform this task for people. But in SH3D there is a super tool Invisible Light Panel it can highlight the background on the box brightly, and not shine towards the stage in any way. The perfect spotlight. Icy inscriptions and snowflakes REFLECT this background. There is no place for the viewer in the studio, they are extras, interfering with the process of the picture. Google?? OK. ?. The shapes are as transparent as possible (and shiny!), but you can set the desired background, and they will sparkle with the right colors. TELEVISION. I'll be honest. I made the first and only version of the picture. You can make an ideal option. But I suggest that everyone do it)))) Here is the file with this scene, you can change the background and get a COMPLETELY different result. Better. Merry Christmas and Happy New Year to everyone! https://www.mediafire.com/file/ri5xj5pgjjgmlg...%25BA%25D0%25B0.sh3d/file
France
Joined: Nov 7, 2005
Post Count: 9181
Status:
Offline
Re: Christmas tree, detailed instructions on how to make it))
Very nice Andrei I guess "Happy New Year" is more orange because it's closer to the lights placed in the tree.
----------------------------------------
Emmanuel Puybaret, Sweet Home 3D developer
Russia
Joined: Aug 13, 2022
Post Count: 233
Status:
Offline
Re: Christmas tree, detailed instructions on how to make it))
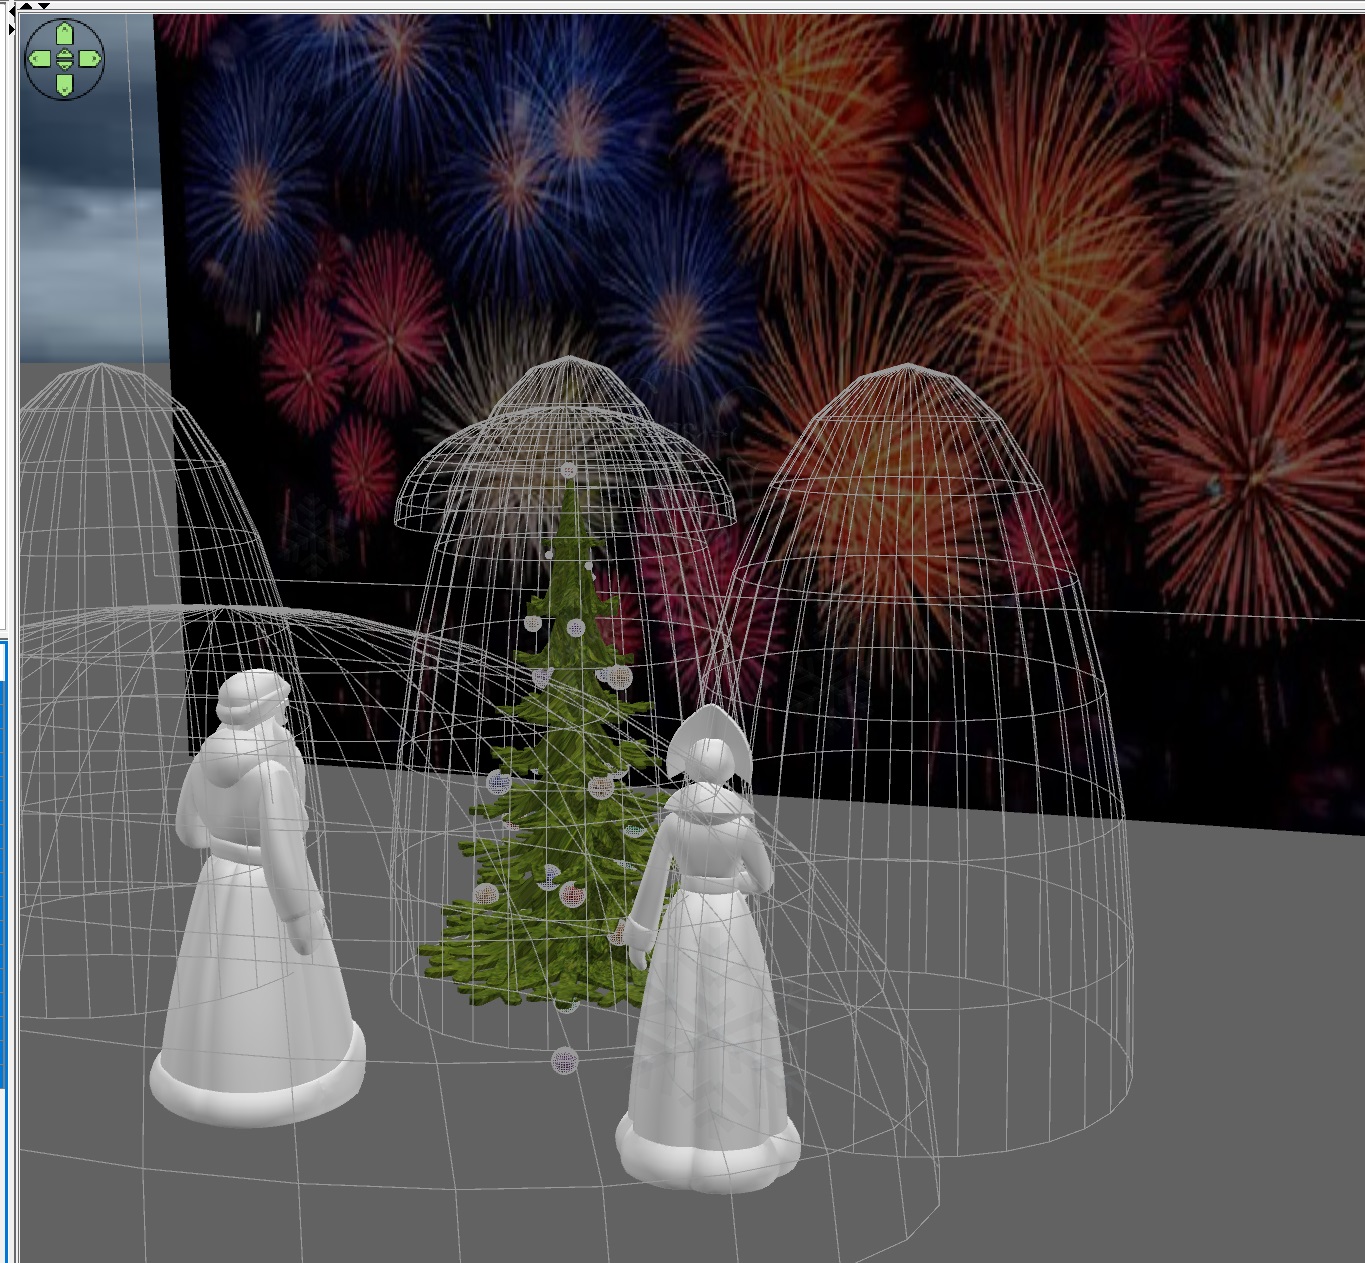
From the inside, the TV studio looks something like this. There are no spectators in front of Santa, there is a huge background with fireworks. My friend the master electrician, at my request, turned off the machine number 16. A very sad sight. Deception looks more joyful than reality. Let's turn on the lights soon! Although.. You can never be sure that this is not a bluff. without background illumination
Russia
Joined: Aug 13, 2022
Post Count: 233
Status:
Offline
Re: Christmas tree, detailed instructions on how to make it))
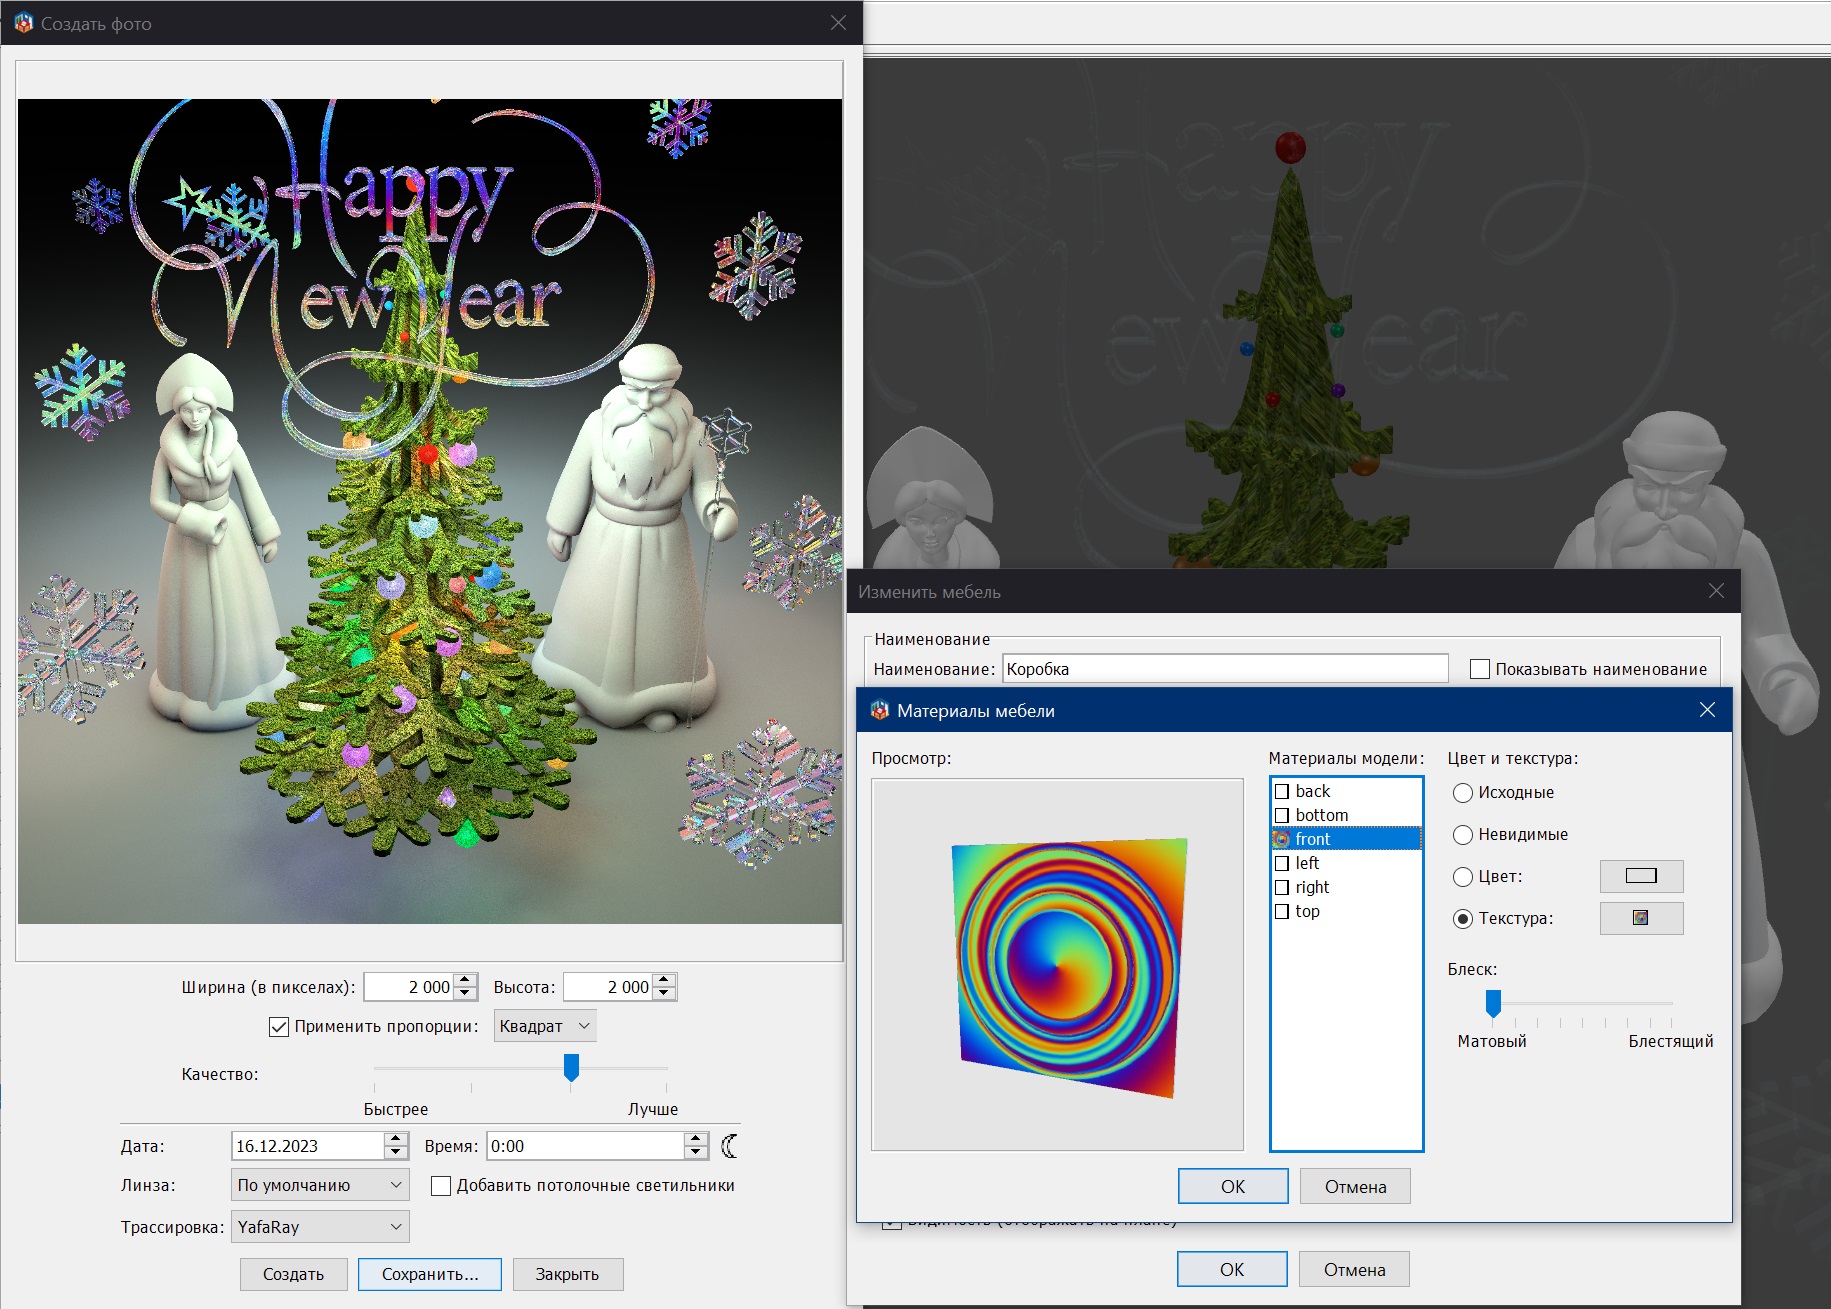
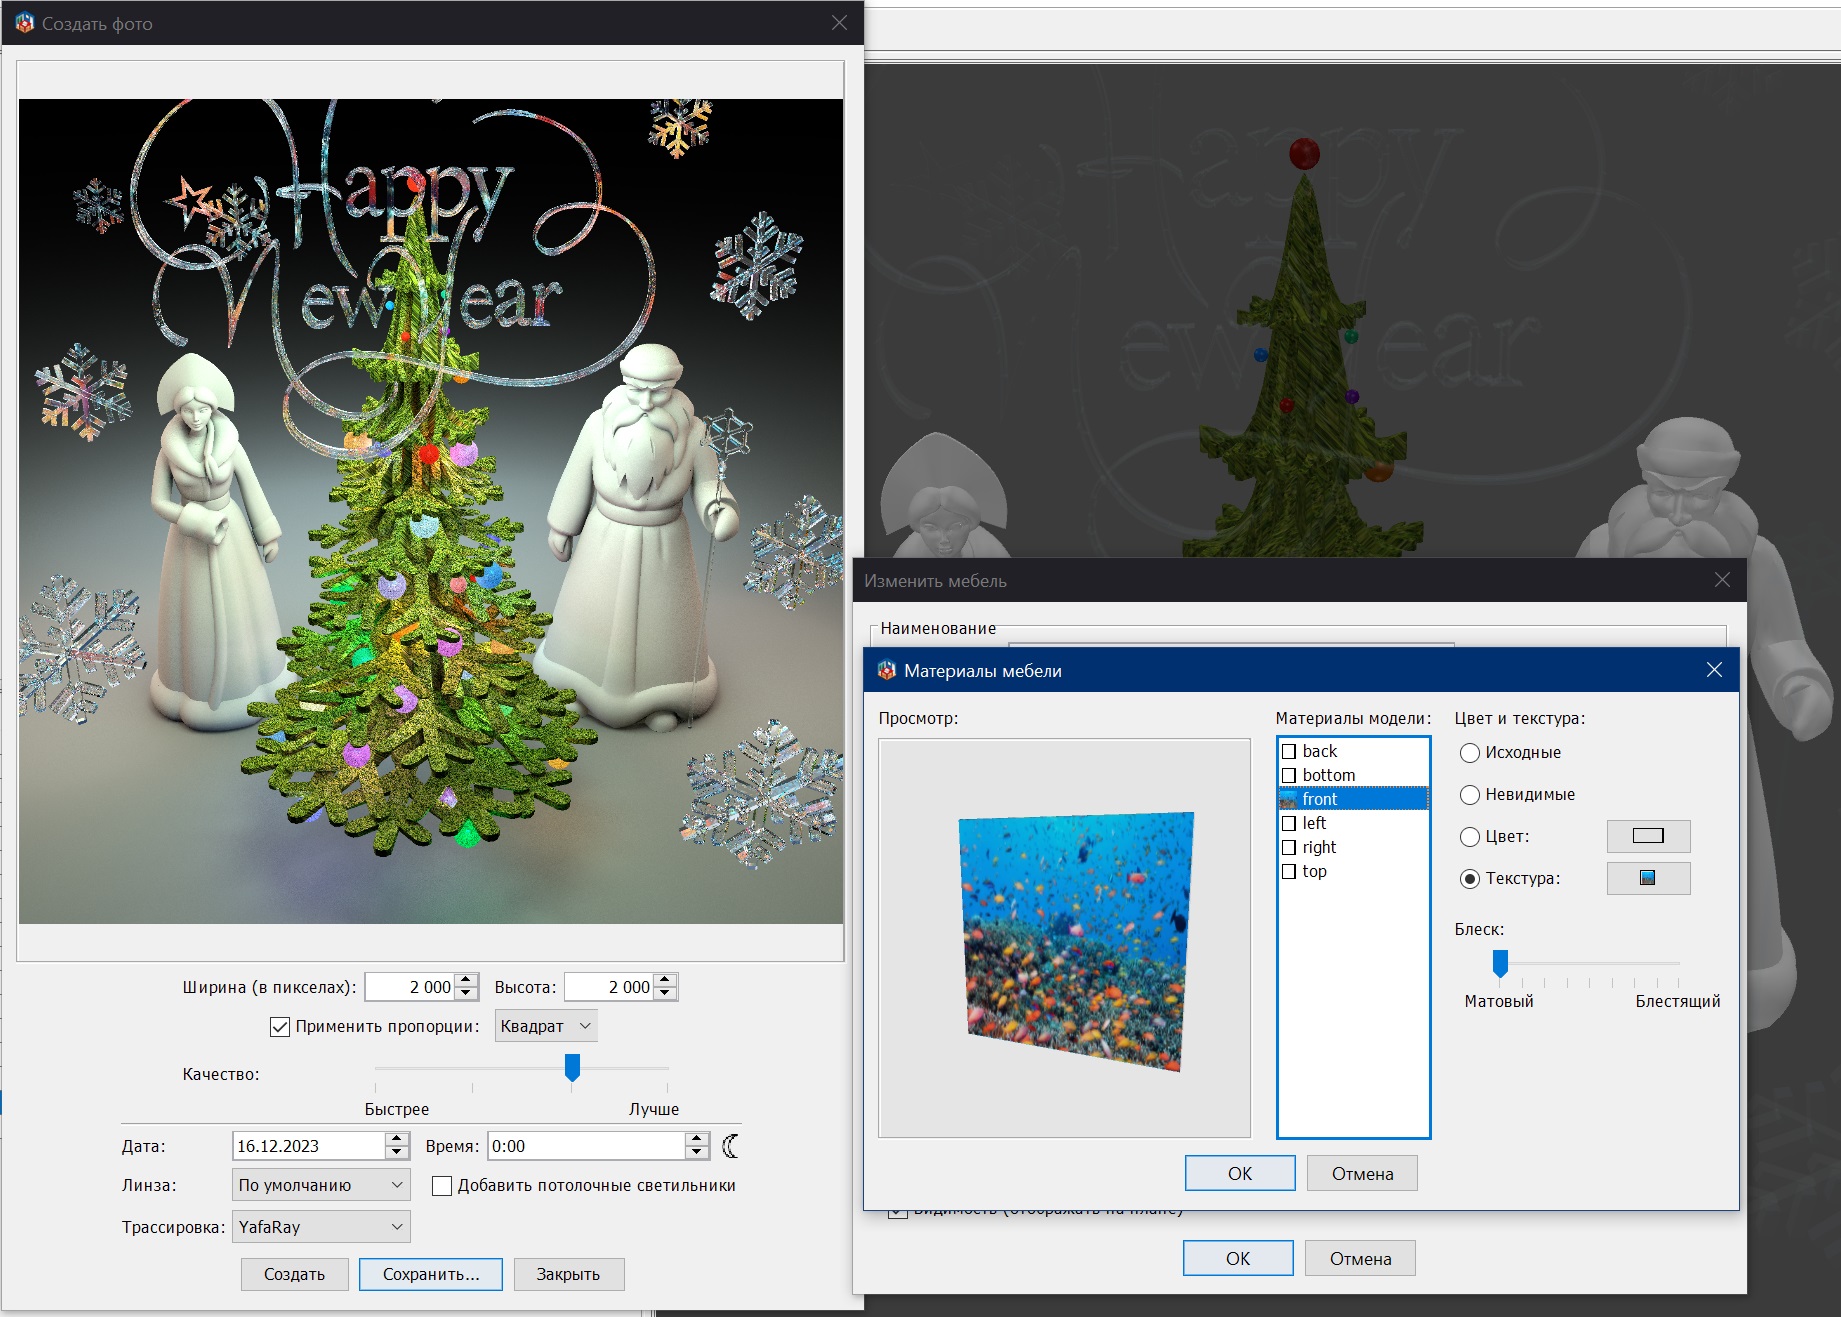
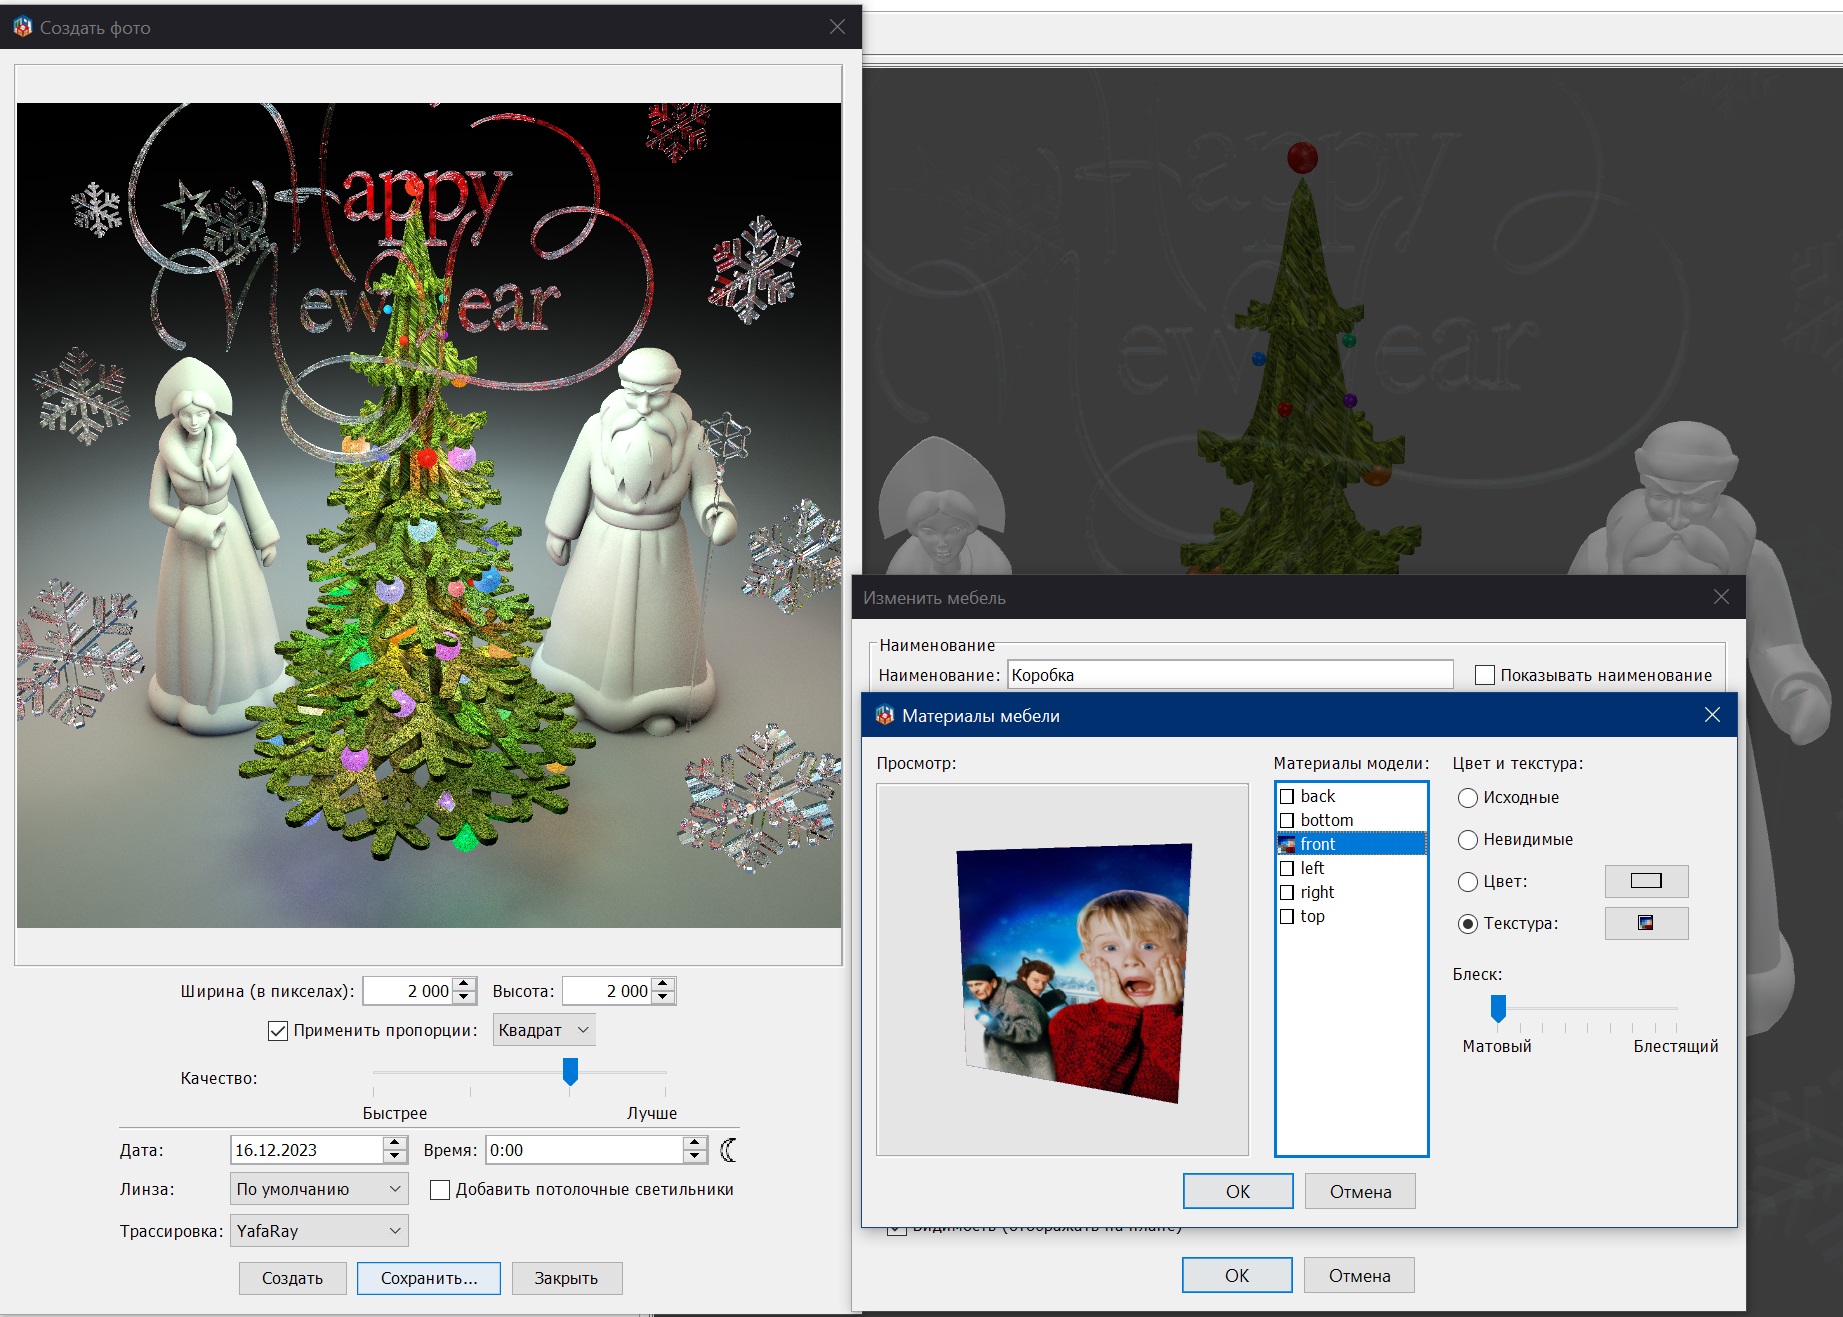
I feel that my ideas are not very clear. I started with the fact that glass as a material cannot be illuminated by light in the same way as an ordinary opaque material. Glass and ice are completely transparent and can only reflect the surrounding colored world. And the brighter it is, the brighter the splashes of glare on the edges of the glasses. The glass models that are made here are very complex and are connected from many rectangular elements (parallelepiped walls). For example, in snowflakes, polished reflective surfaces will be on all six faces of each segment. All of them can reflect their surroundings like a mirror. But the transparent segment itself will remain transparent and colorless, like glass. It is important. Now what I used to make the glass-ice figures shine in all colors and appear colored. The only one who can do this is a giant billboard with a bright pattern. Why is the large size of this billboard so important? Because it is impossible to calculate all the reflections, the angles of the faces in the figures are too different, and the larger the billboard, the higher the probability of reflected light from the faces to the viewer. If the billboard were small, then there would be much less colored splashes on the windows, and somewhere there would not be at all. You can illuminate such a billboard with an excellent tool - a unidirectional light panel (invisible). It needs to be rotated along the X axis by 90, figure out how it shines (to do this, stick its butt into the wall) and turn it towards the billboard. Such a panel can brightly illuminate a picture on a billboard and in no way interfere with the exposed light in the studio. In the next picture, I showed the general location in the studio, you can see where the camera is located, how the billboard lights up. Now how can the process be managed. I have already said that it is impossible to predict reflections completely, one can only assume the overall effect by the color of the highlights. And on poor quality, select the necessary positions of the glass figures. Snowflakes can be rotated slightly along two axes, it is enough to rotate by 2 degrees and the reflections will completely change. You can rotate the image on the billboard, this also completely changes the appearance of reflections. Is it possible to use such a billboard in a room? Yes! After all, an invisible unidirectional panel does not change the lighting in any way, but it is possible to give interesting reflections on shiny and glass surfaces. I will definitely try to apply this unusual method, if everything works out, I will show you the result in the interior of the room.
other pictures on the billboard, small orange fish in the blue sea