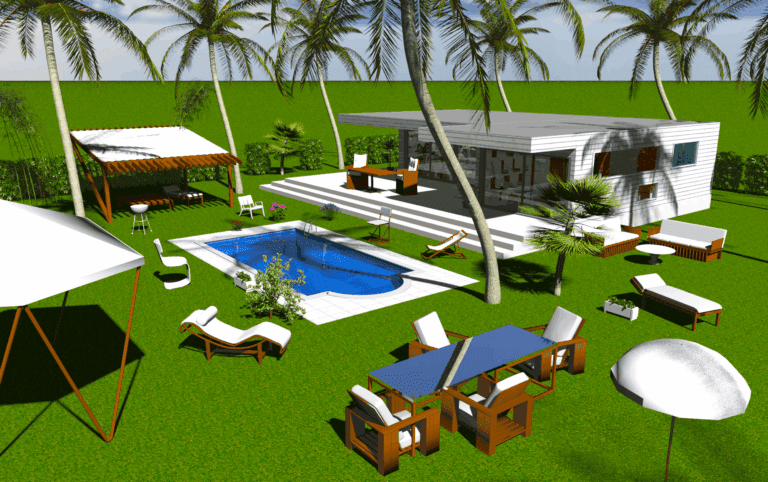
Download

Online

Gallery

Blog

Sweet Home 3D Blog

This blog presents news and tips about Sweet Home 3D.

How to design wall recesses

You recently moved in a castle or in a house with very thick walls? This tip is for you.

In Sweet Home 3D, all the doors and windows make a hole on the walls in 3D upon which you place them (by the way, did you notice that there are many new ones in the furniture catalogue 1.6?).
But in the real life, doors and windows in very thick walls are often placed in recesses. In Sweet Home 3D, when you place doors/windows on such walls, the result in the 3D view might look more or less correct when magnetism is enabled, generally showing no recess like the door in the following example.

From version 5.5, when magnetism is disabled, you can place doors and windows upon thick walls without Sweet Home 3D setting their depth though. According to their depth and the place where you drop a them on walls, you'll get recesses with right angles. This tip shows two ways to design beveled recesses to make them look more realistic.

Designing a recess with beveled edges

This way takes advantage of the manner used by Sweet Home 3D to handle the ends of walls bound to each other.
Select Plan > Create walls menu item, and in an empty part of your plan (or in a new document), draw five thin wall parts like in the following screen capture.

Change the thickness of the first and the last wall parts to match the size you want (here 80 cm). Then change the thickness of the wall part in the middle where the door will be included (here 20 cm). Drag and drop the door you want from the catalog on this wall and adjust its size if necessary.

Set the smallest thickness (0.1 cm) of the two remaining wall parts.

Finally, move the wall part that contains the door to align its exterior side with the side of the main thick wall parts. Once you customized the height and the texture of all the wall parts, you may obtain the result shown in the following image. Don't hesitate to zoom in your design to work precisely!

You have two choices to reproduce it in your home. Either you design separately the previous wall parts and insert them in your home at the place you need them. If you already drew the target wall, you may split it twice with Plan > split wall menu item, move the split end walls to the location where you'll place the recess, remove the wall part in the middle to make an empty space and copy-paste the wall parts and door at that place. Or you may design the house from scratch using this way of doing with smaller wall parts at the places you'll need recesses. Then just adjust the wall parts directly in your home.

You might also need to adjust the surface of the existing rooms to fill the empty space that will appear in front of the door. Either remove the existing room and create it again with the room creation tool, or add points to the room with the contextual menu Add point to room and move them at the new corners.

Using a service hatch to dig a recess

You may find this second way easier to use, mostly if you have to design many recesses (for windows, for example), or if you don't want the recess to spread vertically along all the wall height. 
In an empty place of your plan (or in a new document), draw a simple wall as thick as the ones in your home.
In the furniture catalog, select a Service hatch found in the Doors and windows category and add it upon the wall to make a hole in the wall, like in the following image.

Make the Service hatch invisible by double-clicking on it, selecting the Modify button beside the Materials radio button and choosing the Invisible option in the Furniture materials dialog box.

Change the elevation, size and location of the hole to match the recess you want. To create a recess in the wall, move the hatch with the arrow keys or the mouse after deactivating magnetism (permanently with the preferences dialog box, or temporarily with the Alt key under Windows, the cmd key under Mac OS X or the Shift + Alt keys under Linux). As soon as the hatch doesn't cover fully the wall thickness in the plan, a part of wall appears.

To create beveled edges at the left and the right sides of this recess, copy-paste twice the service hatch, and change the size and location of the copies on the wall like in the following image.

Drag and drop a window on the wall and adjust its location and depth again without magnetism, to place the window on the wall part not covered by the hatch. You can add also a bench using a customized box.

Group three service hatches, the window and the bench with Furniture > Group menu item after selecting them.
Finally, you just have to copy-paste this group upon the walls where you want that design to appear.

Now, you can wait for your friends to visit your new place!

If you're interested, the final scene of this tip comes from the file Castle.sh3d showing the following nice castle (9.2 MB - designed by eTeks and distributed under CC-BY license). Thanks to OKH for the roof parts used to design it.


Avatar: Linda Burns

Re: How to design wall recesses

Thank you for all these beautiful designs. It was worth reading. .

Re: How to design wall recesses

That's exactly what I was looking for to solve a similar challenge in one of my rooms.

Many thanks for sharing!

Avatar: Emil

Re: How to design wall recesses

In Sweet Home 3D ver. 5.7 the wall recess with invisible box or with Service hatch not works.
Avatar: Emmanuel Puybaret

Re: How to design wall recesses

It still works with service hatches, but not with default invisible boxes that will now always make a hole on both sides of a wall whatever their depth when parallel to the wall. If you don't want service hatches, you can still use the special invisible box in DiggingInvisibleBox.sh3f library as explained in this forum thread.
    Get Sweet Home 3D at SourceForge.net. Fast, secure and Free Open Source software downloads
   
© Copyright 2006-2024 eTeks - All rights reserved