How to optimize the design of large buildings
Several tips to help you design large buildings
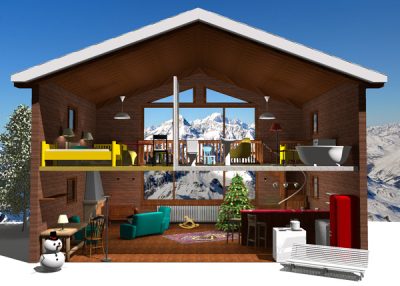
Do you want to create a residence, a hotel or an office building with Sweet Home 3D? This article, based on the three following examples, presents several tips to help you design large buildings (click on the images to view them in 3D and/or click on links to download their Sweet Home 3D file).
 |  |  |
| Sweet Home Hotel (8.3 MB) | Sweet Home Residence (2.2 MB) | Sweet Home Company (2 MB) |
If you know the basics, it’s not especially difficult to design large buildings with Sweet Home 3D. It can even be quite fast if all the levels are similar, like in the Sweet Home Company example.
The main issue may come from your own computer: managing several walls, with many doors and windows on different levels, might slow down the handling of your design, especially in the 3D view when you change level, even if Sweet Home 3D was optimized to handle large buildings faster in versions 6.0 and 6.1.
Controlling the file size
Adding many pieces of furniture of different kinds in your home will make it more complex to handle and will end up with a larger SH3D file. Depending on the circumstances, here are some tips that will help you to better control the performances of your design:
- Prefer to use File > Save and compress menu item each time you quit. It zips your file with no quality loss. Smaller files saves disk space and are faster to transfer and backup.
- For a large building, avoid too many heavy 3D models and high resolution textures. The size of a 3D model is indicated in the information tip displayed when you place the mouse pointer over an item of the furniture catalog.
You may also display the Model size column in the furniture list with the Furniture > Display column > Model size menu item, to check the heaviest 3D models you use in your design (click on the Model size column header to sort the objects by size).

Largest 3D models in Sweet Home Hotel example
- Furnish the rooms with the same 3D models as often as possible. Using many times the same 3D model will enlarge a SH3D file just a little. Like in real life where series are less expensive than unique pieces, avoid also changing the sizes of doors, windows, radiators, washbasins… from a room to another.

Meeting room in the Sweet Home Company example
The Sweet Home Residence example counts more than 1700 pieces of furniture spread in 22 apartments, but as it’s based on 83 different simple 3D models (the largest ones are 365 kB), its file size is only 6.4 MB (2.2 MB when compressed).

Large rooms with small furniture 3D models in the Sweet Home Residence example.
Now, It’s up to you to decorate the apartments!
Minding the foundation
The secret when designing large buildings is to spend more time on the first level(s):
- Set the thickness and height of the load-bearing walls in Sweet Home 3D Preferences, before drawing them.
- Keep place for elevators, stairs, chimneys and for water and CMV (Controlled Mechanical Ventilation) columns… i.e. all the elements that, in principle, stay at the same place from a level to another.

Car park at level -2 of the Sweet Home Residence example
- Distribute the doors along their wall and above all, the windows before placing any furniture. Don’t forget to have a look to the results from outside from an aerial point of view to get a nice architectural rendering.
Selecting the Plan > Distribute horizontally and Distribute vertically menu items can be handy to get a harmonious look of the facade. These menu items can be also very useful to place beams, like in Sweet Home Hotel example.

Ground floor of Sweet Home Hotel example with main walls, windows, water columns, chimneys, staircase and beams placed at the same location as at the upper floor
- Pay attention to interior doors placed on thick walls. Place them without magnetism to prevent their opening and their handles from being too deep (or reduce their depth afterwards).
Checking the room aeras
It is often wise to create temporary rooms to check their area, especially when you draw the partition walls between the load-bearing walls. It prevents from getting too small bedrooms, toilets, kitchens, car parks… A bedroom smaller than 9 m² is difficult to furnish, a too small toilet is not very practical, etc. You may also drag and drop some sample furniture (sink, car, bed, sofa…) to evaluate the volume of a room.
The number of apartments/levels of the Sweet Home Residence was deduced from the number of park places at the underground levels.

Checking lavatories size in the Sweet Home Company example, before repeating them at all levels
Organizing furniture list
When you furnish a large building, the furniture list gets soon very long. To help you find objects in the list, you may:
- Display the Level column in the furniture list by selecting Furniture > Display column > Level menu item, and sort the list by level clicking on its Level header.
- Group the furniture room by room, or apartment by apartment, once you finished to furnish a whole level. Note that you may use the Furniture > Group menu item, even if the selection contains items of a different kind like walls or rooms. Thus, you may select some items in the same area of the plan with one or more selection rectangles before grouping the furniture among the selection. If you forgot to move some pieces in a group you may also cut them and paste them in their group with the Edit > Paste to group menu item (a target group must be selected to enable this menu item).

Furniture grouped by room and sorted by level in Sweet Home Company example
Building level by level
Once you finished a level, you may build a whole building by reproducing it on many levels like in the Sweet Home Company example where the 5 upper levels are a copy of Level 1. Here are the steps you should follow to quickly achieve this kind of building:
- Check the New walls height and New levels floor thickness settings in the Preferences pane, so they match the height and floor thickness of the level you’re going to reproduce (see also this tip for more information about levels).

Floor thickness and height of Level 1 in Sweet Home Company example
- With the focus set on the Plan pane, choose Edit > Select All menu item to select all the items of the selected level.

All selected items in Level 1 in Sweet Home Company example
- Unselect the high items belonging to lower levels which shouldn’t be duplicated, like trees or staircases. You’ll be able to quickly find them if you sort the furniture list by level, like the Trees and Staircase items at Level 0 shown in the previous screenshot (notice the staircase at Level 1 will be duplicated). To unselect an item without losing the current selection, right click on it in the plan and choose it in the Toggle selection menu that will appear. From version 6.1, you may also unselect an object by clicking on it in the furniture list while pressing the Ctrl key (cmd under macOS).
As the compass is unique for all levels, don’t worry about whether it’s selected on not. - Check the Plan pane has the focus (if not, press the Tab key or click on the tab of the duplicated level to avoid losing the selection), and chose Edit > Copy menu item.
- Select Plan > Add Level menu item, then Edit > Paste menu item to create a copy of the level.
- Reproduce the previous step for each level you want to add, possibly using menu item shortcuts to go faster.
- Add a roof at a last level, for example using a large thin box. In Sweet Home Company example, the roof is a room without ceiling created with a double click on an exterior wall to ensure it covers all the building.

Sweet Home Company (alas, nothing to do with reality 😉
Of course, if you want to furnish differently each level, you can also unselect furniture or groups of furniture you want to change at other levels, and copy-paste only the walls, the rooms and the objects like windows, doors and lavatories you want to reproduce at each level (it’s an other advantage to group models).
For example, the levels of the Sweet Home Residence example were built another way to propose different kinds of apartments, with their own configurations (only one or two studios are identical). Only the main walls, the water columns, the elevator door, the staircase, the corridor, the main doors and windows were duplicated at upper levels. Balconies and rooms were placed differently at each level, and many apartments were differently furnished, sometimes partly duplicated from other ones.
 |  |
| The prestigious Sweet Home Residence: from the studio to 3 bedrooms apartments, including a duplex! | |
Modifying items by group
If you change your mind and want to modify some parameters, remember that when you select some items of different kinds (with Plan > Select all menu item or another way), you can modify only the walls belonging to the selection by choosing Plan > Modify walls menu item, to change their height or their top pattern for example. Similarly, you can modify only the rooms of the selection by choosing Plan > Modify rooms menu item to modify their ceiling, for example.
Note also that, if you have grouped many similar models (like the windows of the Sweet Home Company example), you can modify their size and their texture together by choosing Furniture > Modify menu item.
You can also temporarily group items to test a new color or texture:
 |  |
| Red or blue shutters for the Sweet Home Hotel? | |
Visualizing in 3D
Keep in mind that there are different ways to visualize your work in 3D. For a high or large building, the Aerial view mode is sometimes more practical to handle, especially when the view is centered on the selection (check the Aerial view centered on selection option in Preferences pane).
But it’s also useful to visit a place when it is finished in Virtual visit mode, and it’s a good way to check if there is for example, no error on the elevation of objects, which may happen when you move objects around (the elevation of an object is adjusted to its environment only when its elevation is zero, or afterwards, when you select Furniture > Reset elevationmenu item).

The sweet balconies of Sweet Home Residence
Good luck and share your results with the community!
The examples available in this tip are designed by eTeks and distributed under CC-BY license.